
Crafting Colorful Mosaics with Beans and Seeds: A Guide
In a world teeming with vibrant colors and fascinating textures, the humble bean and seed reveal their potential as artistic marvels. Crafting mosaics from these natural elements transcends mere crafting; it’s a celebration of nature’s inherent artistry, transforming simple pantry staples into breathtaking visual displays. This guide navigates the art of assembling these tiny treasures, blending imaginative design with earthy charm to produce tactile artworks that captivate the senses. Whether you’re an experienced artist or embarking on your creative journey, prepare to unlock the kaleidoscopic possibilities held within each bean and seed, turning the ordinary into the extraordinary.
- Transforming Pantry Staples into Art
- Project Overview: Bean and Seed Mosaic
- Gathering Your Artistic Ingredients
- Step-by-Step Mosaic Creation
- 1. Preparing Your Canvas
- 2. Transferring Your Design
- 3. Sorting Your Palette
- 4. Applying Adhesive
- 5. Placing Beans and Seeds
- 6. Layering for Depth
- 7. Drying
- 8. Sealing Your Artwork
- 9. Final Inspection
- Expert Tips for Mosaic Success
- Creative Display and Serving Suggestions
- Bean and Seed Mosaic Material Guide
- Frequently Asked Questions
- Q1: What makes beans and seeds ideal materials for mosaic art?
- Q2: How do I start my mosaic project using beans and seeds?
- Q3: What are some tips for choosing beans and seeds for my mosaic palette?
- Q4: How can I ensure my mosaic will last over time?
- Q5: Can kids participate in making bean and seed mosaics?
- The Conclusion
- Beans and seeds offer a diverse palette of natural colors and textures for unique mosaic art.
- Preparation involves selecting a suitable base, planning a design, and sorting materials.
- Adhesive application and careful placement are key to creating durable and visually appealing mosaics.
- Sealing the finished artwork ensures its longevity and protects it from environmental factors.
Transforming Pantry Staples into Art
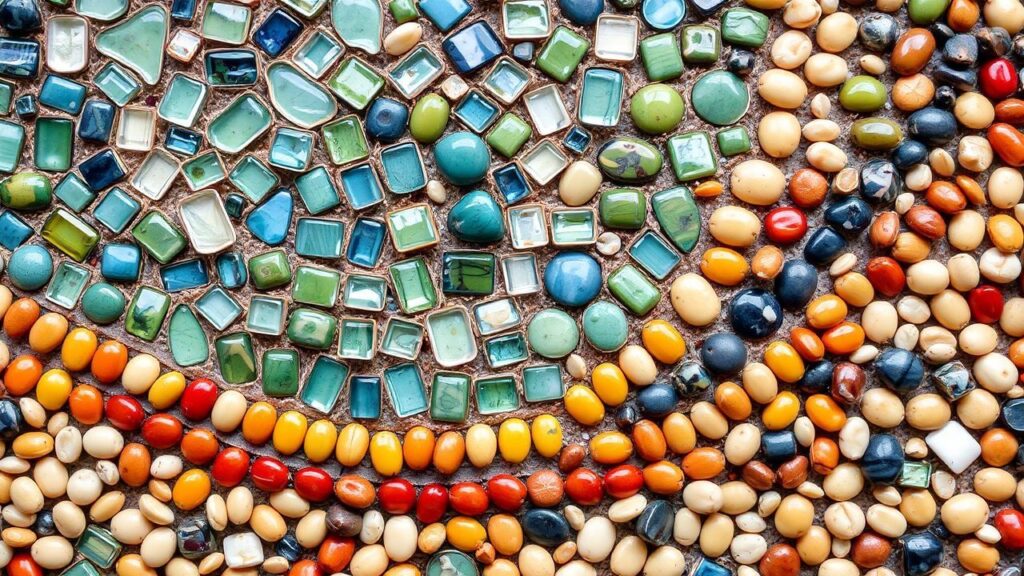
Embarking on the creative journey of crafting colorful mosaics with beans and seeds invites you to explore nature’s palette in unique and vibrant ways. Drawing from textures and hues that span from the creamy white of navy beans to the glossy black of black-eyed peas, this process transforms humble pantry staples into vivid, tactile artwork. Whether you’re a seasoned crafter or trying your hand at natural mosaic art for the first time, these techniques help you harness the allure of organic materials to create pieces that truly pop with life and detail.
The beauty of using beans and seeds lies in their accessibility and natural variation. Each type offers a distinct characteristic: the smooth sheen of lentils, the matte finish of pumpkin seeds, or the subtle curves of various beans. These inherent qualities allow for an incredible range of visual effects, from delicate, intricate patterns to bold, graphic statements. By understanding these properties, artists can compose pieces that are not only visually stunning but also rich in tactile appeal, inviting viewers to look closer and appreciate the materiality.
Project Overview: Bean and Seed Mosaic
Prep and Craft Time
Preparation: 45 minutes | Assembly & Drying: 4 hours | Total Time: Approximately 5 hours
Yield
Creates one mosaic panel approximately 12″ x 12″
Difficulty Level
Intermediate – Ideal for crafters comfortable with precision work and layering techniques.
Gathering Your Artistic Ingredients
Essential Beans and Seeds
- 1 cup dried kidney beans (deep red, rich color)
- 1 cup dried green lentils (smooth texture, soft green hue)
- 3/4 cup dried black-eyed peas (creamy off-white with distinctive black spots)
- 1/2 cup dried pumpkin seeds (flat, matte green)
- 1/2 cup mustard seeds (tiny, round golden yellow)
Adhesives and Tools
- 1 cup all-purpose craft glue (for affixing beans and seeds)
- 1 wooden or sturdy cardboard board (12″ x 12″ base)
- Fine sandpaper (optional, for smoothing base)
- Clear acrylic sealer spray (matte or glossy finish)
- Paintbrush (for applying glue)
- Pattern tracing paper and pencil (for design transfer)
Step-by-Step Mosaic Creation
1. Preparing Your Canvas
Begin by selecting a sturdy wooden or heavy cardboard board. If necessary, lightly sand the surface with fine sandpaper to create a smooth, accepting base for the adhesive. This ensures deeper adhesion and durability for the mosaic.
A well-prepared surface is fundamental for the longevity of your artwork. A smooth, clean base allows the glue to adhere evenly, preventing any lifting or detachment of the beans and seeds over time. This initial step sets the stage for a professional-looking and enduring piece.
2. Transferring Your Design
Sketch your chosen mosaic pattern on tracing paper. Position the paper on the prepared base and carefully transfer the lines with a pencil or light pressure embossing. This creates a clear guide to follow using your beans and seeds.
The transfer process should be precise, ensuring the lines are visible enough to guide your placement but not so dark they detract from the natural beauty of the materials. This blueprint is crucial for maintaining the integrity of your design, especially when working with intricate patterns or detailed color transitions.
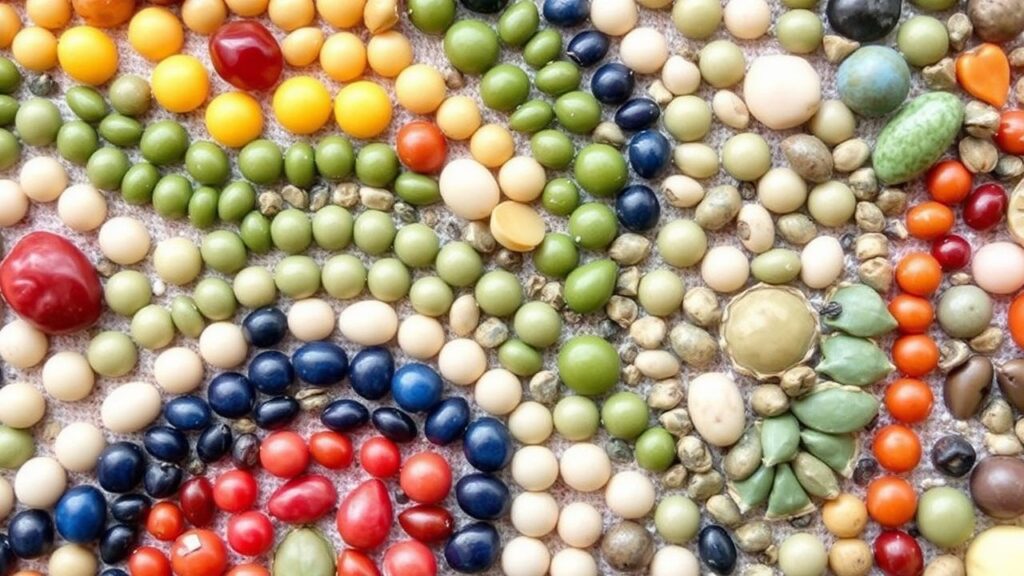
3. Sorting Your Palette
Group beans and seeds based on size, shape, and color intensity. Kidney beans provide a bold scarlet statement, while green lentils add gentle earth tones. Black-eyed peas highlight contrast, and pumpkin seeds lend a subtle pop of green texture. Mustard seeds offer brightness in detailed accent areas.
This sorting phase is akin to a painter selecting their colors. Understanding the unique contribution of each element – the deep reds of kidney beans, the subtle greens of lentils, the striking contrast of black-eyed peas, the matte textures of pumpkin seeds, and the bright pops of mustard seeds – allows for a more intentional and harmonious composition. This organized approach prevents visual clutter and enhances the overall aesthetic appeal of the mosaic.
4. Applying Adhesive
Using a paintbrush, apply a thin, even layer of craft glue to a small section of the base. Work in sections to prevent premature drying. This step-by-step approach maintains working control and placement precision.
It’s vital to use a strong, reliable craft glue that is designed for bonding diverse materials. Applying it in small, manageable sections ensures the glue remains tacky and effective for placing your beans and seeds. Over-applying glue or working on too large an area can lead to dried-out glue before you can place your materials, compromising the bond.
5. Placing Beans and Seeds
Press each bean or seed onto the glued sections, following the design outline meticulously. Use tweezers for tiny seeds for enhanced accuracy. Arrange patterns that create natural rhythm – curves flow beautifully with smaller seeds, and larger beans are perfect for bold blocks of color.
This is where your artistic vision comes to life. Carefully pressing each element into the glue ensures a secure bond. For smaller items like mustard seeds, tweezers are indispensable for maintaining precision. Consider the flow and movement within your design; organic shapes and curved lines are often enhanced by the consistent texture of smaller elements, while larger beans can define areas with bold, impactful color blocks, creating visual interest and depth.
6. Layering for Depth
To amplify texture, layer smaller seeds atop larger beans in select areas, but avoid excessive overlapping that can create unevenness. This layering mimics the dimension seen in traditional mosaic tiles.
Strategic layering can introduce a compelling three-dimensional quality to your mosaic. By carefully placing smaller elements over or adjacent to larger ones, you can create subtle shifts in height and shadow. This technique adds a sophisticated touch, reminiscent of classical mosaic artistry, and enhances the tactile experience of the piece. However, it’s important to apply this thoughtfully, ensuring that the layers don’t compromise the overall flatness and stability of the mosaic.
7. Drying
Allow the mosaic to dry flat for at least 4 hours or preferably overnight to ensure full set of glue and firm embedding of materials.
Patience during the drying phase is paramount. Rushing this process can lead to pieces becoming dislodged or a weak overall structure. Letting the mosaic dry completely, ideally in a stable, flat position, guarantees that the adhesive has fully cured and each bean and seed is securely fixed in place, ready for the final sealing stage.
8. Sealing Your Artwork
Once dry, take the project outdoors or to a well-ventilated space and spray a light coat of clear acrylic sealer evenly over the mosaic. This step locks the beans and seeds in place and protects against moisture, dust, and fading.
The sealing process is a critical final step that protects your creation. A good quality acrylic sealer provides a durable finish, safeguarding the mosaic from environmental damage and wear. Applying it in light, even coats prevents drips or pooling, ensuring a smooth, professional finish that enhances the natural sheen of the beans and seeds while preserving their colors.
9. Final Inspection
After the sealer dries, check for any loose pieces and reinforce with a dot of glue if necessary. Allow to dry before handling or displaying your masterpiece.
A thorough final inspection ensures that every element of your mosaic is secure. This meticulous check-and-reinforce step is your last opportunity to guarantee the integrity of your artwork. Addressing any minor imperfections now will prevent potential issues down the line, ensuring your bean and seed mosaic remains a beautiful and durable piece for years to come.
Expert Tips for Mosaic Success
- Choose a solid, smooth board – this forms a dependable canvas essential for mosaic longevity.
- Enhance vibrancy by soaking beans – soak beans overnight and allow them to dry completely before use; this brings out their natural sheen.
- Maintain a tidy work area – keep your work area tidy and avoid mixing adhesives with water, which can weaken the glue’s hold.
- Seal your mosaic multiple times – seal your mosaic at least twice for optimal protection if it will be displayed in humid or high-traffic areas.
- Experiment with diverse grains – experiment with different grains like quinoa or chia for added texture, and explore dried flowers sparingly to add bursts of organic color.
Creative Display and Serving Suggestions
Once crafted, your mosaic panel becomes a stunning wall accent or tabletop centerpiece. Frame it with natural wood to complement the organic materials used, or mount it on a floating shelf to let the vibrant beans and seeds catch the light.
Displaying your bean and seed mosaic in areas with good natural light will best showcase its intricate details and rich colors. Consider the overall decor of your space; the earthy tones and textures of the mosaic can beautifully complement a variety of interior design styles, from rustic farmhouse to modern bohemian. These pieces also serve as deeply personal and heartfelt handmade gifts, celebrating the artistry inherent in nature.
Bean and Seed Mosaic Material Guide
| Bean/Seed Type | Color | Texture | Size |
|---|---|---|---|
| Kidney Beans | Deep Red | Glossy, Smooth | Large |
| Green Lentils | Soft Green | Matte, Flat | Medium |
| Black-eyed Peas | Creamy with Black Dot | Glossy, Slightly Curved | Large |
| Pumpkin Seeds | Matte Green | Flat, Smooth | Medium-Small |
| Mustard Seeds | Golden Yellow | Round, Tiny | Small |
Discover more natural craft ideas and enhance your creative journey.
For additional inspiration regarding the science of natural adhesives, visit NIST’s research on natural adhesives.
Frequently Asked Questions
Q1: What makes beans and seeds ideal materials for mosaic art?
Beans and seeds are natural, tactile, and come in a vibrant palette of shapes, sizes, and earthy colors. Their organic textures bring warmth and dimension to mosaics, making each piece uniquely beautiful. Plus, they’re easy to find and eco-friendly, aligning with sustainable art practices. The inherent variety ensures that no two mosaics will ever be exactly alike.
Q2: How do I start my mosaic project using beans and seeds?
Begin with a simple design; sketch your pattern on paper or directly onto your base. Lay out your beans and seeds like a puzzle to get a feel for color placement before applying adhesive. Then, secure your design with a strong adhesive, working in small sections to keep everything neat and manageable.
Q3: What are some tips for choosing beans and seeds for my mosaic palette?
Look for variety! Mix big and small beans, round peas, shiny lentils, and textured seeds like sunflower or pumpkin seeds to add contrast and visual interest. Consider soaking lighter seeds or beans to intensify their color or lightly staining them for extra vibrancy, though natural colors often suffice for a beautiful effect.
Q4: How can I ensure my mosaic will last over time?
Use waterproof glue to guard against moisture, especially if your mosaic will be displayed in areas prone to humidity or potential spills. Seal your finished piece with a clear varnish or resin to protect it from dust, fading, and minor abrasions. This preserves your artwork’s beauty for years to come.
Q5: Can kids participate in making bean and seed mosaics?
Definitely! Mosaics with beans and seeds are a fantastic hands-on craft for all ages, fostering creativity and fine motor skills. Kids can improve their dexterity, learn about patterns, and enjoy the sensory experience of sorting and placing beans and seeds. Just supervise glue use for safety, especially with younger children.
Discovering unique materials can elevate your mosaic art. For instance, incorporating quinoa or chia seeds can introduce fine textures, while small dried flowers, used sparingly, can add delicate pops of natural color and organic form. The key is to experiment thoughtfully, ensuring new elements complement the overall aesthetic and structural integrity of the piece.
The Conclusion
As you gather your vibrant beans and shimmering seeds, remember that each tiny piece holds the power to transform a simple surface into a dazzling tapestry of color and texture. Crafting mosaics with these natural materials is not just an art form; it’s a profound connection to the earth and its abundant beauty.
This process celebrates patience, creativity, and the boundless artistry found in everyday elements. Whether you’re a seasoned artist or a curious beginner, these humble ingredients invite you to explore endless patterns and stories, one carefully placed fragment at a time. So pick up your glue, spread your vision, and let your mosaic bloom in hues only nature can provide. Your colorful masterpiece awaits its creation.

