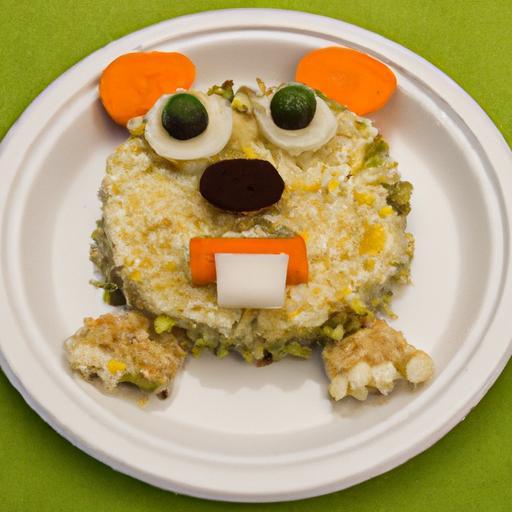
Imagine a world where crispy, sweet treats come to life in the most delightfully monstrous ways. Welcome to the whimsical realm of crafting Rice Krispie monsters-a fun edible adventure that transforms a classic childhood favorite into playful creatures bursting with personality. Whether you’re a parent seeking a creative activity to share with your little ones, an educator looking to spark imagination in the classroom, or simply a dessert enthusiast eager for a hands-on project, these quirky Rice Krispie monsters offer a perfect blend of creativity, taste, and tactile fun. Dive in as we explore easy-to-follow tips, quirky design ideas, and the joy of bringing your sugary creations to life!
- Getting Started with Rice Krispie Monsters: Essential Ingredients and Tools for Sweet Creativity
- Prep and Cook Time
- Yield
- Difficulty Level
- Ingredients
- Instructions
- Tips for Success: Mastering Texture, Shape, and Decoration
- Creative Serving Suggestions and Party Themes to Showcase Your Edible Creations
- Q&A
- The Conclusion
Getting Started with Rice Krispie Monsters: Essential Ingredients and Tools for Sweet Creativity
Crafting Rice Krispie Monsters invites you into a playful and imaginative culinary journey that is as delightful to make as it is to eat. This nostalgic treat transforms simple marshmallow and cereal mixture into whimsical creatures perfect for all ages, making it a beloved choice for celebrations and creative kitchens alike.
Prep and Cook Time
- Prep Time: 15 minutes
- Cook Time: 10 minutes
- Total Time: 25 minutes
Yield
Approximately 12 monster-shaped treats, depending on size
Difficulty Level
Easy – Perfect for beginners and young chefs
Ingredients
- 6 cups of puffed rice cereal (such as Rice Krispies)
- 4 cups mini marshmallows
- 3 tablespoons unsalted butter
- Food coloring gels (assorted vibrant colors)
- Edible googly eyes (available at baking stores or online)
- Colored icing tubes (for facial details)
- Sprinkles and edible confetti
- Candy canes, licorice strings, and candy fangs (for monster features)
- Non-stick cooking spray or butter (for shaping hands)
Instructions
- Prepare your workspace by lightly greasing a large mixing bowl and a flat surface or baking sheet. This will help prevent sticking as you work with the marshmallow mixture.
- Melt the butter in a large saucepan over low heat. Add the mini marshmallows and stir gently until completely melted and smooth, about 5 minutes. Remove from heat immediately to avoid overcooking.
- Divide the marshmallow mixture into separate bowls if you want to create multi-colored monsters. Add a small amount of food coloring gel to each bowl and gently fold until the colors are vibrant and fully incorporated.
- Fold in the puffed rice cereal steadily, stirring with a silicone spatula until each cereal grain is coated with the marshmallow mixture. Work quickly while the mix is malleable.
- Using greased hands, shape the sticky mixture into desired monster body shapes, such as round heads or elongated bodies. Press firmly to mold smooth, compact shapes that hold together well.
- Place shaped bodies on the prepared surface and allow them to cool for about 10 minutes. This resting period helps the treats to set firmly without becoming hard.
- Embellish your monsters by attaching edible googly eyes, drawing expressive faces with colored icing, and adding candy adornments like fangs, horns, or colorful spikes. Use sprinkles to mimic scales or textured skin patterns.
- Let decorated monsters rest for 15 minutes at room temperature to allow decorations to adhere fully before serving or packaging.
Tips for Success: Mastering Texture, Shape, and Decoration
- Control the marshmallow temperature: Working when marshmallows are hot lets you mold easier but can be tricky – cool slightly for firmer shaping.
- Use non-stick gloves or spray your hands: Handling sticky marshmallow mix is simpler with lightly greased hands to avoid mess and tearing shapes.
- Experiment with shapes: Use cookie cutters or freehand sculpting to create a variety of monster silhouettes, from round and cuddly to tall and spiky.
- Color with gels, not liquid dyes: Gel colors bring vividness without affecting consistency.
- Personalize your monsters: Add edible glitter, metallic candies, or even flavored extracts mixed in the marshmallow for unique twists.
Creative Serving Suggestions and Party Themes to Showcase Your Edible Creations
Show off your Rice Krispie Monsters on a themed platter lined with colorful parchment paper resembling monster “lairs.” Arrange with complementary treats like gummy worms or candy rocks to create a playful environment. For parties, build a “Monster Mash” table where kids or guests can customize their own creatures with various toppings and decorations. Pair your monsters with fun drinks like “slime” punch (lime sherbet with soda) or spooky smoothies for a fully immersive experience. For gifting, wrap each monster individually in cellophane bags tied with bright ribbons and name tags, making them both charming and portable.
| Nutritional Info (per monster) | Calories | Protein (g) | Carbohydrates (g) | Fat (g) |
|---|---|---|---|---|
| Standard Rice Krispie Monster | 180 | 2 | 35 | 3 |
| With extra candy decorations | 210 | 2 | 40 | 4 |
For a deeper background on marshmallow techniques and decorative ideas, explore this professional culinary resource. Additionally, see our article on Fun Halloween Desserts for more spooky inspiration that complements your Rice Krispie Monster creations.

Q&A
Q&A: Crafting Rice Krispie Monsters – A Fun Edible Adventure
Q1: What inspired the idea of making Rice Krispie Monsters?
A1: The inspiration comes from blending childhood nostalgia with a spark of creativity! Rice Krispies are a classic treat, and transforming them into playful monsters adds a spooky, fun twist that delights kids and adults alike. It turns snack time into an imaginative adventure.
Q2: What basic ingredients do I need to start crafting Rice Krispie Monsters?
A2: You’ll need the classic trio: Rice Krispies cereal, melted marshmallows, and butter. From there, grab some food coloring, candy eyes, licorice strings, gummy worms, and any colorful candies or edible decorations you love to bring your monster to life!
Q3: How do you shape the Rice Krispie mixture into monster forms?
A3: Once your marshmallow mixture is melted and combined with the cereal, let it cool slightly but stay pliable. Use your hands (lightly buttered) to mold the sticky mixture into fun shapes-round blobs, ovals, or quirky silhouettes. Imagination leads the way, so each monster can have unique ears, horns, or limbs you form by pinching and sculpting.
Q4: Are there tips for decorating monsters to make them extra spooky or silly?
A4: Absolutely! Use candy eyes of different sizes for a googly-eyed look. Licorice ropes can become wild hair or tentacles, while gummy worms make excellent monster tongues or antennae. Colored icing pens add scars, teeth, and goofy smiles. Try mixing edible glitter or use colored cocoa butter paints for an otherworldly glow.
Q5: Can this activity be adapted for different age groups or skill levels?
A5: Definitely! Younger kids can focus on simple shapes and sticking on candy eyes, while older children and adults can experiment with intricate details and layered colors. It’s a versatile craft that grows in complexity with your creativity.
Q6: What’s the best way to store Rice Krispie Monsters once they’re made?
A6: To keep your edible monsters fresh and crispy, store them in an airtight container at room temperature. Avoid refrigeration, as moisture can make them soggy. They’re best enjoyed within a couple of days when their puffed texture is at its peak.
Q7: Can Rice Krispie Monsters be themed for parties or holidays?
A7: Absolutely! Customize your monsters with seasonal colors and decorations-think green and purple for Halloween goblins, red and white for silly Valentine creatures, or pastel hues for springtime critters. They double as festive treats and adorable party décor!
Q8: What’s the biggest challenge in making Rice Krispie Monsters?
A8: The stickiness of the marshmallow mixture can be a bit tricky, but the key is working quickly and keeping your hands buttered or slightly damp. Also, patience helps as you let the shapes cool to hold their form before decorating.
Q9: Any final tips for someone embarking on this fun edible adventure?
A9: Embrace the mess and the magic! Each monster is wonderfully unique, and the joy comes from creativity and playfulness. Gather your favorite candies, turn on some spooky tunes, and dive into making monsters that are as tasty as they are terrifyingly cute.
Crafting Rice Krispie Monsters is more than just making treats-it’s an imaginative journey where crafting meets snacking with a cheerful, monstrous twist!
The Conclusion
As you wrap up your edible adventure in crafting Rice Krispie monsters, remember that the magic lies not only in the treats themselves but in the joy of creation and imagination they inspire. Whether you’re shaping quirky eyes, mischievous grins, or wild, colorful hair, each monster is a unique work of art-and a delicious one at that. So gather your ingredients, embrace your inner monster maker, and let every crispy bite remind you that cooking can be a playful journey filled with sweetness and creativity. Happy crafting!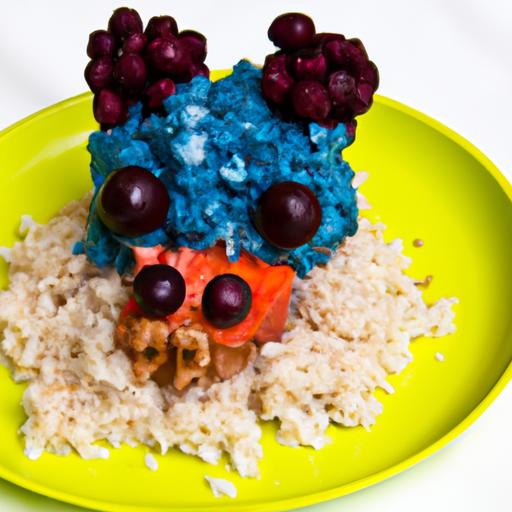


