In the heart of the kitchen, where flour dust dances in sunbeams and the scent of sweet meringue fills the air, magic happens-especially when little hands join the adventure. Baking a pavlova with kids isn’t just about dessert; it’s about creating memories, sparking creativity, and whisking wonder into every step of the process. This airy, delicate treat, with its crisp crust and marshmallow-soft center, offers the perfect canvas for learning and laughter. Join us as we explore how to turn this classic dessert into a joyful, hands-on experience that will delight the whole family and make baking together a cherished tradition.
Whisking Wonders in the kitchen is where science meets creativity, especially when making pavlova with kids. This airy, crisp-on-the-outside, marshmallow-soft-on-the-inside dessert invites little chefs to explore the fascinating froth of egg whites as they transform into a beautiful cloud-like meringue. Originating from New Zealand and Australia, pavlova is not just a dessert-it’s a magical experience that sparks joy and learning in equal measure.
Prep and Cook Time
- Preparation: 20 minutes
- Cooking: 1 hour 15 minutes
- Cooling: 1 hour (room temperature)
Yield
Serves 6 to 8
Difficulty Level
Medium – Best undertaken with adult supervision when baking with children
Ingredients
- 4 large egg whites at room temperature
- 1 cup (200g) superfine sugar
- 1 tsp white vinegar
- 1 tbsp cornstarch (cornflour)
- 1 tsp vanilla extract
- 1 cup heavy cream for whipping
- Fresh fruit for topping: sliced kiwifruit, strawberries, passion fruit pulp, blueberries
- Optional flavor twists: lemon zest, cocoa powder, or a splash of almond extract
Instructions
- Preheat the oven to 275°F (135°C). Line a baking sheet with parchment paper and draw a 8-inch circle as your pavlova base template to guide meringue shaping.
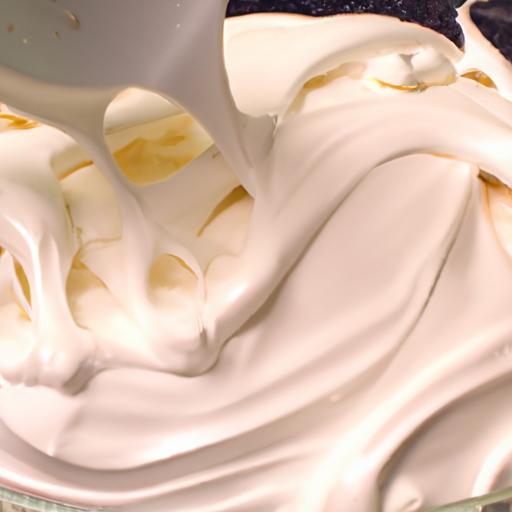
- Start beating the egg whites in a perfectly clean, grease-free bowl using a hand or stand mixer. Whisk on medium speed until soft peaks form-this means the peaks should hold gently but droop slightly.
- Gradually add superfine sugar, one tablespoon at a time. Whip after each addition, increasing speed to high. Continue until the meringue is glossy and stiff peaks form, meaning peaks stand tall and firm when the whisk is lifted.
- Sprinkle in cornstarch and white vinegar, gently folding in with a spatula. These ingredients stabilize the meringue, creating its iconic crispy shell and marshmallow center.
- Fold in vanilla extract carefully for a delicate aroma without deflating the mixture.
- Transfer the meringue onto your parchment circle, smoothing the edges with a spatula and creating a slight well in the center for the toppings later.
- Bake the meringue for 1 hour 15 minutes or until crisp on the outside. Then switch off the oven, leave the door ajar, and allow the pavlova to cool completely inside – this prevents cracking and ensures the soft interior.
- Whip the heavy cream until soft peaks form using a clean bowl and whisk. Spread the cream in the meringue’s center once cooled.
- Decorate with fresh fruit generously, encouraging kids to create colorful patterns and playful designs-this fuels their culinary imagination.
- Serve immediately to enjoy the contrast of crunchy shell and tender cream-filled center.
Tips for Success
- Always use room temperature egg whites for maximum volume.
- Ensure all bowls and utensils are grease-free to prevent deflating the meringue.
- Superfine sugar dissolves easily-if unavailable, pulse regular granulated sugar a few times in a food processor.
- Teaching kids to whisk gradually and watch the meringue change texture is both educational and magical.
- Use edible markers on parchment to outline creative decorating zones to help little hands focus but encourage freedom.
- Make ahead: The meringue base can be baked a day in advance if stored in an airtight container; add cream and fruit just before serving.
- For a fun twist, beeswax food coloring or natural powders like beetroot can add subtle pastel hues to the meringue mixture.
Creative Decorating Ideas to Spark Imagination
Encourage children to transform their pavlova into a garden, ocean scene, or abstract art using vibrant fruit pieces, edible flowers, and even small dollops of colored whipped cream. Use cookie cutters as stencils to sprinkle cocoa or cinnamon on top. Introduce fun shapes by layering sliced fruits in spirals or smiley faces that tell a story on each plate.
Safety Tips and Fun Techniques
- Teach kids to crack eggs on a flat surface, then use separate bowls to avoid shell bits.
- Supervise oven use and teach the importance of using oven mitts and keeping a safe distance.
- Turn cleanup into a game by using colored water and sponges for wiping counters and utensils.
- Use rubber spatulas and beaters with rounded edges for safe handling and effective mixing.
Delicious Flavor Twists and Topping Suggestions
Add zest and zing with a sprinkle of lemon zest or a drizzle of passion fruit juice atop the whipped cream. For a chocolate lover’s delight, dust some fine cocoa powder or fold in chocolate chips before baking. Nutty fans can sprinkle crushed pistachios or toasted almonds after assembly. To make it truly a family celebration, experiment with tropical fruits like mango or star fruit to awaken taste buds with vibrant flavors.
Serving Suggestions
Plate each pavlova on a bright ceramic dish that contrasts with the pure white meringue. Add a few mint leaves for color balance and freshness. Pair with a scoop of vanilla ice cream or a tangy fruit coulis drizzled artfully around the plate to elevate the dining experience. Invite family members to share stories behind their decorating choices, making every bite meaningful.
| Nutrition per serving | Calories | Protein | Carbs | Fat |
|---|---|---|---|---|
| Pavlova base | 220 | 4g | 50g | 0g |
| Whipped cream (2 tbsp) | 50 | 0.5g | 1g | 5g |
| Fresh fruit topping (1/2 cup) | 35 | 0.5g | 9g | 0g |
| Total | 305 | 5g | 60g | 5g |
Looking to expand your culinary adventures with kids? Check out our family-friendly dessert recipes for more creative baking ideas. For the science behind egg whites and meringue stability, visit Science Daily’s detailed explanation.

Q&A
Q&A: Whisking Wonders – Baking a Pavlova with Kids Made Fun
Q1: What makes baking a pavlova such a magical activity to do with kids?
A1: Baking a pavlova is like creating a fluffy cloud of sweetness that kids can watch rise and transform in the oven. It’s a hands-on experience that mixes science (whipping egg whites to stiff peaks!), art (decorating with colorful fruits), and, best of all, a delicious reward. Kids love seeing their efforts turn into a crispy-on-the-outside, marshmallowy-on-the-inside masterpiece.
Q2: How do you keep children engaged during the pavlova-making process?
A2: Turn baking into a storytelling adventure! Give each step a fun name-like “The Whisking Whirlpool” or “The Sugar Shower.” Let kids guess how the meringue will change shape. Encourage taste tests of each ingredient, especially the fresh fruit toppings. Most importantly, keep the kitchen lively with music or a baking-themed game to make waiting time fly by.
Q3: What are some kid-friendly tips for whisking the meringue?
A3: To make whisking exciting, treat the bowl and whisk like magical instruments. Ask kids to “chase the whites till they shine bright” or “beat the clouds until they’re stiff.” Using an electric mixer can speed things up and reduce arm fatigue, but if whisking by hand, having short, energetic rounds of whisking with breaks can keep little arms fresh and enthusiasm high.
Q4: How do you ensure safety while baking with little helpers?
A4: Safety first! Keep kids away from hot oven doors and sharp utensils. Assign age-appropriate tasks like measuring sugar, washing fruits, or decorating the pavlova. Use silicone baking mats or parchment paper to avoid sticky messes slipping around. And always supervise closely during oven handling, turning it into a “grown-up moment” they can watch from a safe distance.
Q5: What are some fun decorating ideas that kids can try on their pavlova?
A5: Let creativity shine with rainbow berries, slices of kiwi, passionfruit pulp, and edible flowers. Create patterns like smiley faces, stars, or even little animal shapes. For an added crunch, sprinkle chopped nuts or chocolate chips. You can also try drizzling honey or flavored syrups as “magic rivers” across the marshmallowy mountain.
Q6: Can this activity teach kids about cooking science?
A6: Absolutely! Whipping egg whites teaches about air incorporation and protein structure. Watching the meringue bake introduces the idea of how heat changes texture. Kids also learn about balancing sweetness and acidity when tasting the fruit toppings. This makes pavlova-making not only delicious but a tasty science experiment in disguise.
Q7: What’s the key to turning pavlova baking into a joyful ritual rather than a chore?
A7: Focus on fun, not perfection. Celebrate each whisk, crack, or dollop as a win. Keep the pace light-hearted and mix in laughter and stories. Remember, a pavlova that’s a little cracked or lopsided is still a masterpiece made with love – and that’s the secret ingredient kids will remember forever.
In Retrospect
As the final swirl of whipped cream crowns your crispy, cloud-like pavlova, you’ll realize that the true magic wasn’t just in the baking-it was in the laughter, the sticky fingers, and the shared moments of discovery. Whisking Wonders isn’t just a recipe; it’s an invitation to bond, to create, and to savor the sweet joy that comes from making something delicious together. So next time you gather your little chefs, remember: the best ingredients are always curiosity, patience, and a pinch of playful wonder. Happy baking!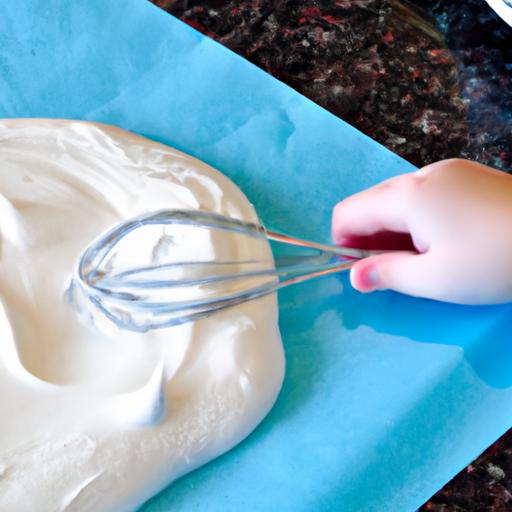

