The Enduring Allure of Pierogi: A Taste of Polish Heritage
The humble pieróg, a delicate half-moon of dough embracing a savory filling, stands as a profound emblem of Polish culinary identity. While the landscape of Polish cuisine is rich and varied, featuring hearty stews, succulent meats, and vibrant salads, it is often the pierogi that captures the heart and imagination of both Poles and international admirers. This dumpling, a versatile vessel for a myriad of fillings, has transcended its peasant origins to become a celebrated dish gracing family tables, festive gatherings, and even fine dining establishments. Among the pantheon of pierogi varieties, the classic combination of potato and cheese—known colloquially as “ruskie” pierogi, a misnomer that perhaps points to their historical Eastern Polish roots—holds a special place. It is proof of the power of simple, quality ingredients, transformed through careful technique into something truly extraordinary.
- The Enduring Allure of Pierogi: A Taste of Polish Heritage
- The Quintessential Potato and Cheese Filling: Ingredients and Preparation
- Ingredients for the Dough:
- Ingredients for the Filling:
- Preparation of the Filling:
- Crafting the Dough:
- Assembling and Cooking Pierogi: The Art of the Fold
- Serving Suggestions and Nutritional Profile
- Elevating Pierogi to Restaurant Quality: Expert Techniques and Considerations
- Frequently Asked Questions about Pierogi
At a Glance: Mastering Potato and Cheese Pierogi
- Dough Mastery: The secret to tender, pliable pierogi dough lies in using the right flour, the perfect amount of liquid, and a gentle touch during kneading.
- Filling Harmony: Achieving the ideal potato and cheese filling requires balancing the creamy richness of potatoes with the tangy, salty notes of cheese, often enhanced with caramelized onions.
- Shaping Precision: Consistent shaping ensures even cooking and a visually appealing final product, with various crimping techniques adding to the artisanal charm.
- Cooking Nuance: Boiling followed by pan-frying offers a delightful textural contrast, transforming a soft boiled dumpling into a golden-brown delight.
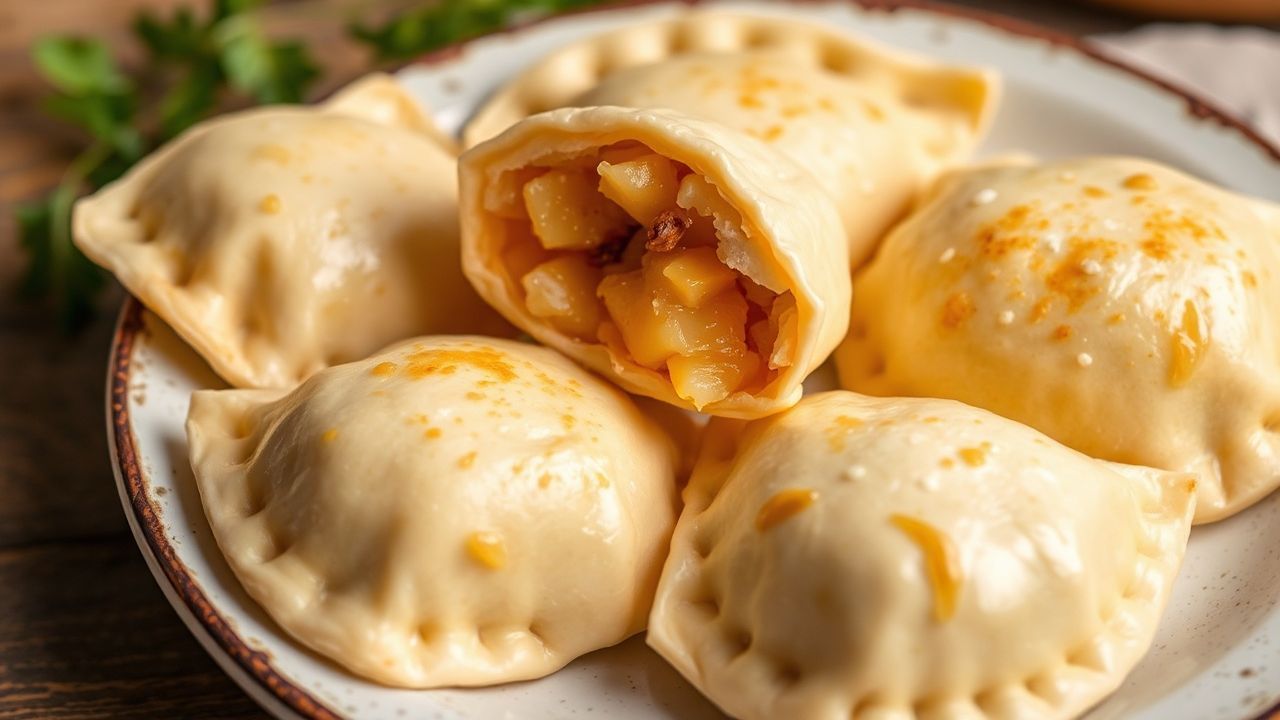
The ubiquity of pierogi across Poland is not accidental. They are a dish that speaks of resourcefulness, utilizing staple ingredients like potatoes, flour, and cheese, often available even in leaner times. Their adaptability means they can be a light appetizer, a substantial main course, or a comforting supper. The “ruskie” variant, specifically, embodies a satisfying earthiness. The creamy mashed potato forms a comforting base, while the cheese—traditionally twaróg (farmer’s cheese) or a sharp, aged cheddar—provides a tangy counterpoint. This interplay of textures and flavors is what makes this particular pierogi filling so universally beloved. Understanding the nuances of preparing these dumplings from scratch is not merely about following a recipe; it’s about engaging with a culinary tradition that has been passed down through generations, a practice deeply embedded in the fabric of Polish life.
The Quintessential Potato and Cheese Filling: Ingredients and Preparation
Crafting the perfect pierogi begins with a profound understanding of its core components: the dough and the filling. For the classic potato and cheese pierogi, these elements must work in concert, each enhancing the other.
Ingredients for the Dough:
- Flour: 3 cups (approximately 360g) All-purpose flour (plus more for dusting)
- Egg: 1 large egg
- Water: ½ cup (120ml) Warm water
- Salt: 1 teaspoon
- Butter/Oil: 2 tablespoons Melted unsalted butter or neutral oil (optional, for added richness)
Ingredients for the Filling:
- Potatoes: 1.5 lbs (approximately 680g) Starchy potatoes (e.g., Russet, Yukon Gold), peeled and quartered
- Cheese: 1 cup (approximately 100g) Farmer’s cheese (Twaróg) or a sharp, aged cheddar, crumbled or grated
- Onion: 1 medium yellow onion, finely diced
- Butter: 2 tablespoons Unsalted butter
- Salt: To taste
- Black Pepper: To taste
- Optional: Pinch of nutmeg
Preparation of the Filling:
The soul of the “ruskie” pierogi lies in its filling. This is where the magic of transforming simple ingredients truly begins.
First, the potatoes must be cooked until fork-tender. Boiling is the traditional method, ensuring they cook through evenly. Once tender, drain them thoroughly, allowing any excess steam to escape. This step is crucial; excess moisture in the potatoes can lead to a gummy filling and make the dough difficult to work with. While the potatoes are still warm, mash them until smooth. A potato ricer or a food mill yields the finest, most consistent texture, preventing any starchy lumps from marring the filling’s silken quality. It’s at this stage that any optional butter or oil can be incorporated for added richness, though many purists prefer to let the inherent flavors of potato and cheese shine.
Simultaneously, the onions must be rendered down to a state of sweet, caramelized perfection. In a skillet, melt the butter over medium-low heat. Add the finely diced onion and cook slowly, stirring occasionally, until they are translucent, golden brown, and deeply fragrant. This process can take 15-20 minutes, and patience is rewarded with a depth of flavor that raw or quickly sautéed onions simply cannot provide. The caramelization extracts the natural sugars from the onion, lending a subtle sweetness that beautifully complements the savory potatoes and tangy cheese.

Once the potatoes are mashed and the onions are caramelized, combine them in a large bowl. Add the crumbled farmer’s cheese or grated cheddar. Season generously with salt and freshly ground black pepper. A pinch of nutmeg, if using, adds a subtle warmth and complexity. Mix everything together until well combined, but avoid overmixing, which can make the filling paste-like. The goal is a cohesive mixture that is still slightly textured, with discernible pieces of potato and cheese. Taste and adjust seasoning as needed. The filling should be flavorful enough to stand on its own, as it will be the primary taste sensation within the dumpling.
Crafting the Dough:
The pierogi dough is a delicate balance of structure and tenderness, designed to enclose the filling without becoming tough or gummy.
In a large mixing bowl, whisk together the all-purpose flour and salt. Create a well in the center and crack in the egg. Gradually pour in the warm water and the melted butter or oil, if using. Begin to mix with a fork or your hands, gradually incorporating the flour from the sides of the well. Once a shaggy dough begins to form, turn it out onto a lightly floured surface. Knead the dough gently for about 5-7 minutes, or until it becomes smooth, elastic, and slightly tacky, but not sticky. The key here is to avoid overworking the dough, which can develop the gluten too much, resulting in tough pierogi. The dough should feel supple and yielding, like a well-worked playdough.
After kneading, cover the dough with a damp cloth or plastic wrap and let it rest for at least 30 minutes at room temperature. This resting period allows the gluten to relax, making the dough much easier to roll out and shape. Skipping this step will result in a dough that springs back aggressively when you try to roll it thin, leading to frustration and potentially uneven pierogi. The rest is as critical as the kneading itself for achieving that signature tender bite.
Assembling and Cooking Pierogi: The Art of the Fold
With the dough rested and the filling prepared, the meticulous process of assembling the pierogi can begin. This stage requires patience and a gentle hand to ensure each dumpling is perfectly sealed and ready for its culinary transformation.
Shaping and Filling the Pierogi:
There are several methods for shaping pierogi, each yielding slightly different results and requiring varying degrees of dexterity.
One common approach involves rolling out a portion of the rested dough to about 1/8-inch thickness. Using a round cutter (a glass or a cookie cutter, typically 3-4 inches in diameter), cut out circles of dough. Place a tablespoon of the potato and cheese filling in the center of each circle, being careful not to overfill, as this can make sealing difficult. Moisten the edges of the dough circle with a little water or egg wash. Fold the dough in half over the filling, creating a half-moon shape. Press the edges firmly to seal, ensuring no air pockets remain. You can then crimp the edges with a fork for a decorative finish or use a traditional “kopytka” (little hoof) crimping technique by pressing the edges together with your thumb and forefinger.
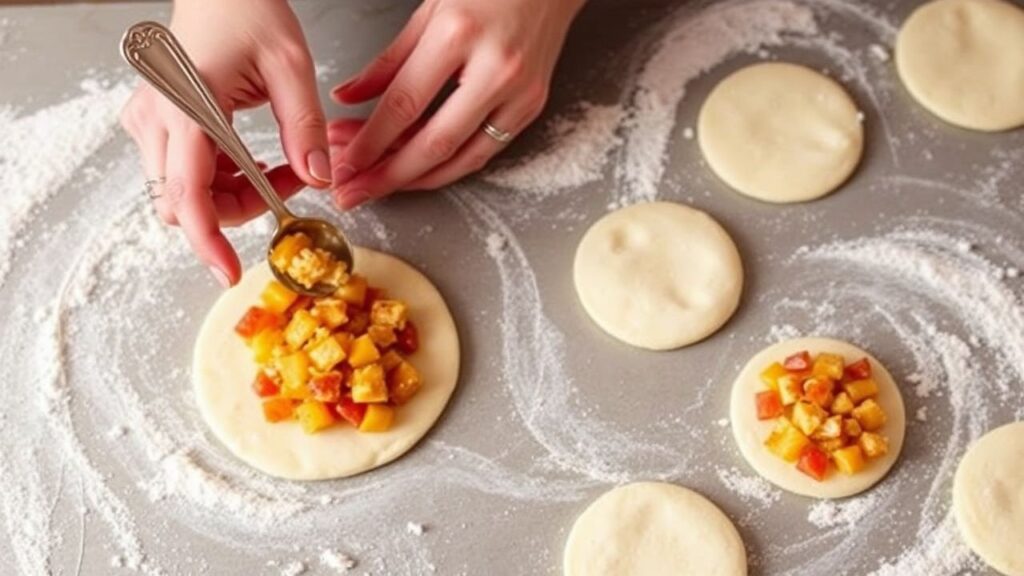
Alternatively, one can roll the dough into a long rope about 1/2 inch in diameter, then cut it into small, equal pieces. Flatten each piece into a small disc, then gently roll it thinner to about 3-4 inches in diameter. The filling and sealing process then follows as described above. Whichever method is chosen, the goal is a uniform size and a secure seal to prevent the filling from escaping during the cooking process. As you work, keep the uncooked pierogi covered with a damp cloth to prevent them from drying out.
[TIP]Expert Insight: For an extra layer of flavor and to prevent sticking, lightly dust your work surface and the pierogi themselves with a fine semolina flour instead of regular all-purpose flour. This adds a subtle nutty note and a delightful texture.
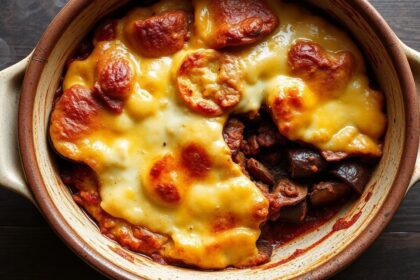
The Cooking Process: Boiling and Pan-Frying
The journey from raw dough to a finished pieróg is typically a two-stage process: boiling to cook the dough through, followed by pan-frying for a delightful golden crust and added richness.
Bring a large pot of generously salted water to a rolling boil. Carefully drop the pierogi into the boiling water, working in batches to avoid overcrowding the pot. Overcrowding will lower the water temperature too drastically and cause the pierogi to stick together. Stir gently to ensure they don’t adhere to the bottom of the pot. The pierogi will sink initially, but as they cook, they will float to the surface. Once they float, let them simmer for an additional 2-3 minutes to ensure the dough is cooked through. Using a slotted spoon, carefully remove the boiled pierogi from the water, allowing excess water to drain.
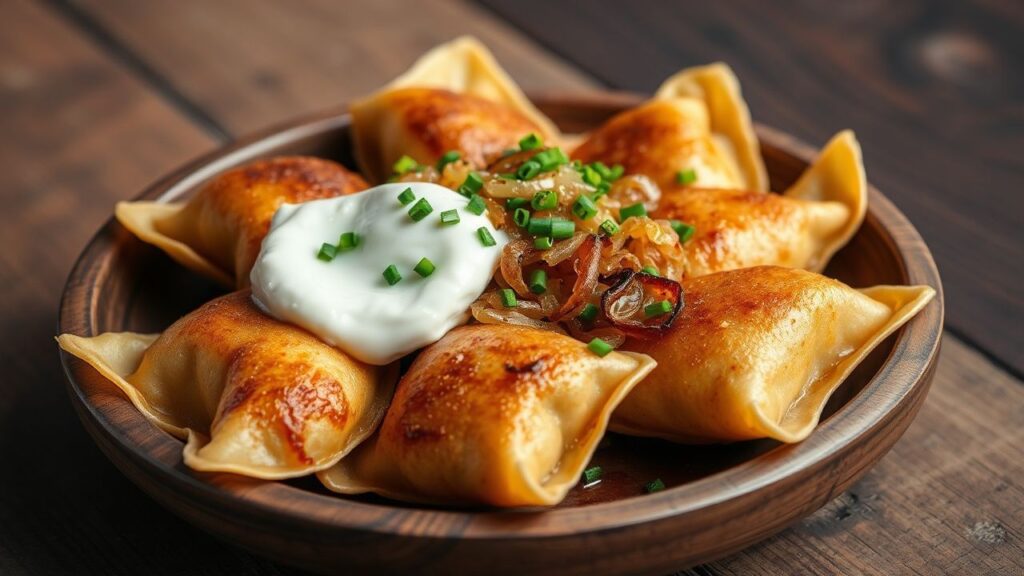
For the pan-frying stage, melt a generous amount of butter in a skillet over medium heat. Add the boiled pierogi in a single layer. Fry for 3-5 minutes per side, or until they are golden brown and slightly crispy. This step is not just about aesthetics; it adds a wonderful textural contrast to the soft interior and infuses the pierogi with a delightful buttery flavor. Some chefs like to add a tablespoon or two of water to the pan during the frying process, covering it briefly. This creates steam, which helps to soften the interior of the pierogi while the outside crisps up beautifully.
[WARNING]Pro-Caution: Ensure the water is at a rolling boil before adding the pierogi. Adding them to lukewarm water will result in gummy, poorly cooked dumplings that are difficult to handle and less appealing in texture.
Serving Suggestions and Nutritional Profile
The classic potato and cheese pierogi, once perfectly cooked and pan-fried to a golden hue, are ready to be savored. Their versatility in serving is one of their greatest assets.
Traditional Accompaniments:
While the pierogi themselves are satisfying, they are often elevated by simple yet flavorful accompaniments that complement their savory profile.
The most traditional topping for “ruskie” pierogi is a dollop of sour cream, its cool tang a perfect foil to the warm, rich filling. Another beloved addition is sautéed onions, often cooked in butter until deeply caramelized, mirroring the onions used in the filling. For a richer, more indulgent experience, some enjoy them with a sprinkle of crispy fried bacon bits or a drizzle of melted butter. Freshly chopped chives or dill also add a burst of freshness and color, cutting through the richness.
Beyond these classic pairings, consider a simple green salad with a light vinaigrette to balance the meal. For a more substantial supper, serving them alongside a hearty Polish sausage (kielbasa) or a small portion of braised cabbage can create a truly authentic Polish dining experience. The beauty of pierogi lies in their ability to adapt to various palates and occasions, from a casual family meal to a more elaborate festive spread.
Nutritional Information (Approximate per serving, assuming 6-8 pierogi):
The nutritional profile of pierogi can vary significantly based on the richness of the filling, the amount of butter used in preparation and serving, and the portion size. This estimate is for a typical serving of potato and cheese pierogi, pan-fried with a moderate amount of butter and served with a dollop of sour cream.
| Nutrient | Amount (approx.) |
|---|---|
| Calories | 350-450 kcal |
| Protein | 10-15 g |
| Fat | 15-25 g |
| Saturated Fat | 7-12 g |
| Carbohydrates | 40-55 g |
| Fiber | 2-4 g |
| Sodium | 400-600 mg |
Keep in mind that these figures are estimates. The use of farmer’s cheese, which is typically lower in fat than aged cheddar, can influence the fat content. Similarly, opting to boil the pierogi without pan-frying will significantly reduce the overall fat and calorie count. For those mindful of their intake, consider serving them with a lighter topping like Greek yogurt instead of sour cream, or simply with fresh herbs.
Elevating Pierogi to Restaurant Quality: Expert Techniques and Considerations
Transforming homemade pierogi from merely good to truly exceptional requires attention to detail and a nuanced understanding of culinary artistry. These are the subtle touches that distinguish a home cook’s best effort from a professional chef’s refined creation.
The Dough’s Demeanor:
The foundation of any great pieróg is its dough. Achieving a delicate, almost ethereal texture that melts in the mouth is paramount.
Using a high-quality, finely milled all-purpose flour is essential. Some chefs advocate for a blend of all-purpose flour and a small percentage of pastry flour to achieve maximum tenderness. The ratio of liquid to flour is critical; too much will result in a sticky, unmanageable dough, while too little will yield a tough, crumbly texture. The resting period for the dough should not be underestimated; at least 30 minutes is ideal, but an hour can lead to even more pliable dough. For an even richer dough, consider substituting half of the water with milk or buttermilk, or incorporating a tablespoon of sour cream directly into the dough mixture. This adds a subtle tang and enhances the overall tenderness.
When rolling the dough, aim for a consistent thickness of about 1/16 to 1/8 inch. Too thick, and the dough will overpower the filling; too thin, and it risks tearing. A pasta machine can be invaluable for achieving uniform thickness across all your pierogi, ensuring even cooking. The key is a dough that is tender, slightly elastic, and has a subtle chew without being rubbery.
The Filling’s Finesse:
The potato and cheese filling is the heart of this classic pieróg, and its balance is crucial.
The quality of the potatoes matters immensely. Starchy varieties like Russets or Yukon Golds, when properly cooked and mashed, provide a creamy, fluffy base. Avoid waxy potatoes, which can result in a gluey texture. The cheese choice is also significant. While farmer’s cheese (Twaróg) offers a traditional tang and creamy texture, a high-quality aged cheddar or a blend of cheeses can add complexity. Ensure the cheese is finely grated or crumbled for even distribution. The caramelization of the onions should be slow and patient; undercooked onions will impart a sharp, pungent flavor that detracts from the overall harmony. Some chefs add a touch of caramelized onion jam or even a small amount of roasted garlic to the filling for an extra layer of sophisticated flavor. Seasoning should be precise, allowing the inherent flavors of the potato and cheese to lead, with salt and pepper providing the necessary backbone.
[TIP]Expert Insight: For an incredibly smooth filling, pass the mashed potatoes through a fine-mesh sieve before combining them with other ingredients. This removes any remaining lumps and ensures a velvety texture that complements the tender dough.
The Art of the Seal and Cook:
A perfectly sealed pieróg not only prevents leaks but also contributes to the overall aesthetic and texture.
When sealing the pierogi, ensure there are no air pockets trapped between the dough and the filling. These pockets can expand during cooking and cause the pierogi to burst. Press firmly along the entire seam, and consider a decorative crimp. The “kopytka” crimp, while traditional, can be challenging. A simple fork crimp is effective and visually appealing. For the cooking process, boiling in well-salted water is standard. However, the subsequent pan-frying is where true elevation occurs. Using good quality butter in a hot skillet ensures a beautiful golden-brown crust without burning. Don’t overcrowd the pan; this allows for even crisping. Some chefs add a splash of white wine or chicken broth to the pan during the final stages of frying, deglazing the pan and infusing the pierogi with an additional layer of savory depth.
Consider serving the pan-fried pierogi with a drizzle of brown butter, infused with a sprig of thyme or a clove of garlic. This simple addition transforms the dish with nutty aromas and a richer mouthfeel. For a truly gourmet presentation, a sprinkle of microgreens or a delicate garnish of crème fraîche can add a touch of elegance. The goal is to create a textural contrast between the crisp exterior and the yielding, flavorful interior, all while balancing the savory, tangy, and creamy notes of the filling.
Frequently Asked Questions about Pierogi
H3: Can I make pierogi dough ahead of time?
Yes, pierogi dough can be made ahead of time. Once kneaded, wrap it tightly in plastic wrap and refrigerate for up to 2 days. Before using, let it sit at room temperature for about 30 minutes to become more pliable. The dough can also be frozen for up to 2-3 months. Thaw it in the refrigerator overnight before proceeding with rolling and shaping.
H3: What is the best way to store leftover pierogi?
Cooked pierogi can be stored in an airtight container in the refrigerator for 3-4 days. For longer storage, freeze them. Arrange the cooked pierogi in a single layer on a baking sheet lined with parchment paper and freeze until solid. Once frozen, transfer them to a freezer-safe bag or container. Reheat them by pan-frying or baking until heated through.
H3: How can I prevent my pierogi from sticking together?
To prevent pierogi from sticking together during boiling, ensure you use a large pot with plenty of water and stir them gently as soon as they are added. Don’t overcrowd the pot. After boiling, drain them well and proceed immediately to pan-frying or toss them with a little oil or melted butter to prevent them from sticking to each other before cooking. If you’re freezing uncooked pierogi, flash-freezing them on a parchment-lined baking sheet first is the best method.
H3: What are some alternative fillings for pierogi?
The world of pierogi fillings is vast and exciting! Beyond potato and cheese, popular options include:
- Meat: Ground pork or beef, often seasoned with marjoram and onion.
- Cabbage and Mushroom: Sauerkraut or fresh cabbage with sautéed mushrooms and onions, particularly popular during Lent.
- Sweet Cheese: Farmer’s cheese sweetened with sugar and often flavored with vanilla or lemon zest, served with fruit sauces.
- Fruit: Seasonal berries like blueberries, strawberries, or cherries, often served as a dessert pieróg.
- Spinach and Feta: A modern, Mediterranean-inspired twist.
Experimentation is key to discovering your personal favorite!
See also: Pierogi


