
At a Glance: Mastering the Russian Beef Piroshki
- Dough is Key: A perfectly balanced dough, whether for baking or frying, is paramount for achieving the ideal texture – tender and yielding, never tough or greasy.
- Flavorful Filling is Non-Negotiable: The beef filling must be rich, deeply seasoned, and possess a pleasing, not mushy, consistency.
- Technique Matters: Whether shaping delicate half-moons or robust turnovers, precision in sealing and cooking ensures a beautiful presentation and optimal taste.
- Versatility is its Strength: Piroshki are adaptable, serving as a hearty snack, a substantial part of a meal, or even a celebratory treat.
The history of piroshki is inextricably linked with the vastness of Russia itself. These small, filled buns, found in countless variations across Slavic cultures, are more than just food; they are edible parcels of comfort, born from necessity and perfected through generations of culinary evolution. The concept of enclosing fillings within dough is ancient, but the piroshki, as we recognize them today, emerged as a practical solution for portability and preservation, particularly during long journeys or arduous winters. The beef piroshki, with its robust and satisfying filling, represents a particularly cherished iteration, proof of the hearty appetites and resourcefulness of the Russian people. Imagine a time when a traveler, traversing the immense Siberian plains, would carry a batch of these durable, nutrient-dense pastries, each one a miniature feast providing warmth and energy. This foundational understanding of their purpose imbues the modern preparation with a deeper significance.
- The Soul of the Piroshki: Crafting the Dough
- The Heart of the Matter: Crafting the Savory Beef Filling
- The Culmination: Baking or Frying to Perfection
- Nutritional Insights: A Wholesome Indulgence
- Approximate Nutritional Information per Baked Piroshki (1 of 12):
- Approximate Nutritional Information per Fried Piroshki (1 of 16):
- Expert Pro-Tips for Elevated Piroshki
- 💡 Expert Insight Expert Insight: The Umami Boost.
- ⚠️ Pro-Caution Pro-Caution: The Peril of Overcrowding the Fryer.
- Conclusion: A Legacy of Comfort and Craft
- Frequently Asked Questions about Piroshki
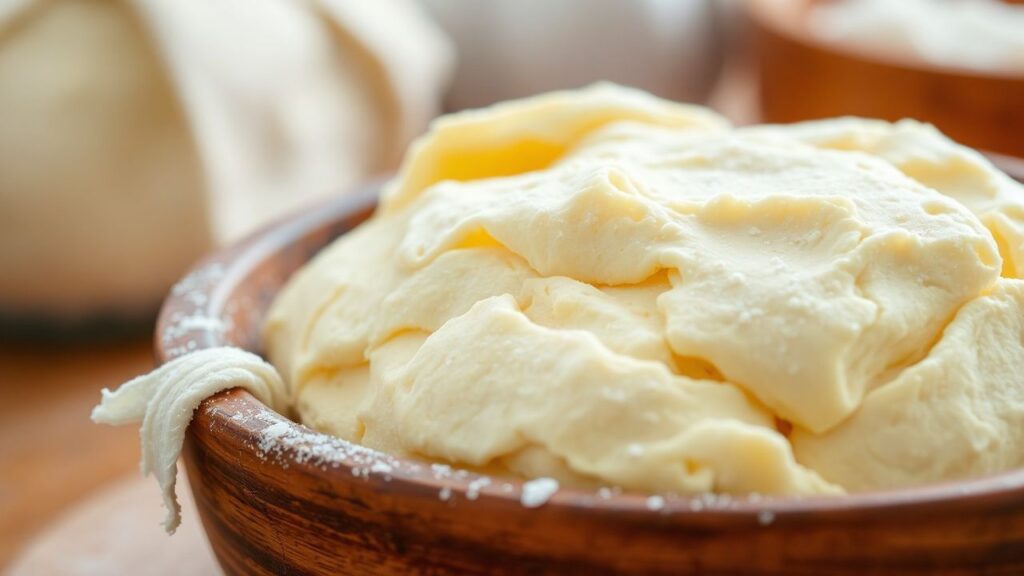
The Soul of the Piroshki: Crafting the Dough
The foundation of any exceptional piroshki lies in its dough. It must possess a delicate balance: tender enough to melt in the mouth, yet sturdy enough to contain its flavorful filling, whether destined for the gentle embrace of the oven or the crisp baptism of hot oil. This duality of purpose necessitates a thoughtful approach to ingredients and technique. Two primary dough styles dominate: the enriched yeast dough for baked piroshki, and a simpler, often egg-enriched dough for fried varieties.
Baked Piroshki Dough: The Enriched Yeast Method
For baked piroshki, a yeasted dough offers unparalleled tenderness and a slightly sweet, yielding crumb. It’s a dough that benefits from patience and a gentle hand. The process begins with activating the yeast, a crucial step that ensures a lively rise and a light texture.
Ingredients for Baked Piroshki Dough:
- 1 cup (240ml) warm milk (105-115°F / 40-46°C)
- 2 ¼ teaspoons (7g) active dry yeast
- 1 tablespoon (15g) granulated sugar, plus a pinch for proofing
- 3 ½ cups (440g) all-purpose flour, plus more for dusting
- ½ teaspoon salt
- 2 large eggs, at room temperature
- ¼ cup (57g) unsalted butter, softened
Preparation Method for Baked Piroshki Dough:
1. In a small bowl, combine the warm milk, a pinch of sugar, and the active dry yeast. Stir gently and let it sit for 5-10 minutes until it becomes foamy, indicating the yeast is active.
2. In a large mixing bowl, whisk together the flour and salt.
3. Create a well in the center of the flour mixture. Pour in the foamy yeast mixture, the 1 tablespoon of sugar, and the lightly beaten eggs.
4. Using a wooden spoon or a dough hook attachment on a stand mixer, begin to incorporate the ingredients until a shaggy dough forms.
5. Add the softened butter, piece by piece, and continue mixing until the butter is fully incorporated and the dough begins to pull away from the sides of the bowl. This will take about 5-8 minutes.
6. Turn the dough out onto a lightly floured surface and knead for 8-10 minutes, or until it becomes smooth, elastic, and supple. The dough should spring back slowly when gently poked.
7. Lightly grease a clean bowl with oil. Place the dough in the bowl, turning to coat. Cover the bowl tightly with plastic wrap or a damp kitchen towel.
8. Allow the dough to rise in a warm place for 1 to 1.5 hours, or until it has doubled in size.
9. Once doubled, gently punch down the dough to release the air. It is now ready to be shaped with your chosen filling.
Fried Piroshki Dough: The Simpler, Quicker Approach
For those who crave the irresistible crunch and airy interior of fried piroshki, a slightly different dough approach is employed. This version often omits yeast, relying on baking powder or simply the richness of eggs and butter for leavening and a tender crumb.
Ingredients for Fried Piroshki Dough:
- 2 cups (250g) all-purpose flour, plus more for dusting
- ½ teaspoon salt
- 1 large egg
- ½ cup (120ml) milk or sour cream (kefir also works wonderfully)
- 2 tablespoons (28g) unsalted butter, melted
Preparation Method for Fried Piroshki Dough:
1. In a medium bowl, whisk together the flour and salt.
2. In a separate bowl, whisk together the egg, milk (or sour cream/kefir), and melted butter until well combined.
3. Gradually add the wet ingredients to the dry ingredients, mixing with a fork or spoon until a soft, slightly sticky dough forms.
4. Turn the dough out onto a lightly floured surface and knead for 2-3 minutes, just until it comes together. Over-kneading will result in tough piroshki.
5. The dough is ready to be filled and shaped immediately.
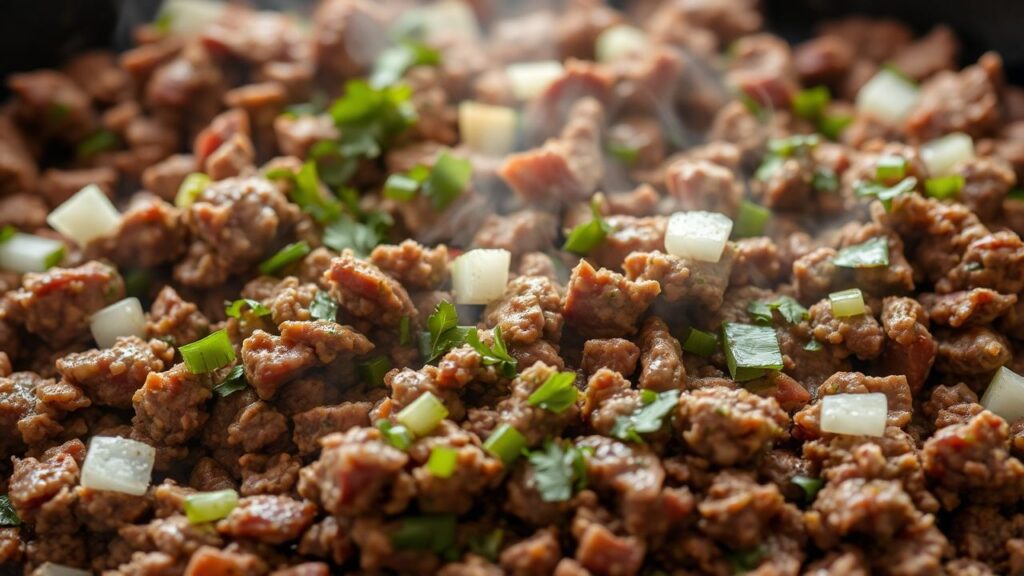
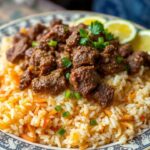
The Heart of the Matter: Crafting the Savory Beef Filling
A truly magnificent piroshki is defined by its filling. For the beef variety, this means a deeply savory, well-seasoned mixture that is moist but not watery, and possesses a pleasing texture. It’s a filling that requires attention to detail, from the quality of the meat to the nuanced seasoning.
Ingredients for Savory Beef Filling:
- 1 lb (450g) ground beef (80/20 lean-to-fat ratio is ideal for flavor)
- 1 large onion, finely chopped
- 2 cloves garlic, minced
- 1 tablespoon olive oil or butter
- ½ teaspoon salt, or to taste
- ¼ teaspoon black pepper, or to taste
- ¼ teaspoon dried dill (optional, but highly recommended)
- 1-2 tablespoons beef broth or water (if needed for moisture)
- 2 tablespoons finely chopped fresh parsley
Preparation Method for Savory Beef Filling:
1. Heat the olive oil or butter in a large skillet over medium heat. Add the finely chopped onion and sauté until softened and translucent, about 5-7 minutes.
2. Add the minced garlic and cook for another minute until fragrant, being careful not to burn it.
3. Add the ground beef to the skillet. Break it up with a spoon and cook, stirring occasionally, until browned and no pink remains.
4. Drain off any excess fat from the skillet.
5. Season the beef mixture with salt, black pepper, and dried dill (if using). Stir well to combine.
6. If the mixture seems a little dry, add 1-2 tablespoons of beef broth or water to create a slightly more moist filling.
7. Remove from heat and stir in the fresh parsley. Allow the filling to cool completely before using it to fill the piroshki. This is a critical step to prevent the dough from becoming soggy.
The Art of Shaping and Filling
Once both the dough and filling have reached the correct temperature and consistency, the true artistry of piroshki making begins. The shaping process is where tradition meets personal flair.
1. Portioning the Dough: For baked piroshki, divide the risen dough into 12-16 equal portions. For fried piroshki, you can make them slightly smaller, dividing the dough into 16-20 portions. Roll each portion into a ball.
2. Flattening: On a lightly floured surface, flatten each dough ball into a disc approximately 4-5 inches (10-12 cm) in diameter. The edges should be slightly thinner than the center to prevent the dough from becoming too thick when folded.
3. Filling: Place 1-2 tablespoons of the cooled beef filling onto one half of each dough disc, leaving a ½-inch (1 cm) border.
4. Sealing: Moisten the edges of the dough with a little water or egg wash. Fold the other half of the dough over the filling to create a half-moon shape. Press the edges firmly to seal, ensuring no filling can escape during cooking. For baked piroshki, you can crimp the edges decoratively with a fork or by pinching and twisting. For fried piroshki, a secure seal is paramount.
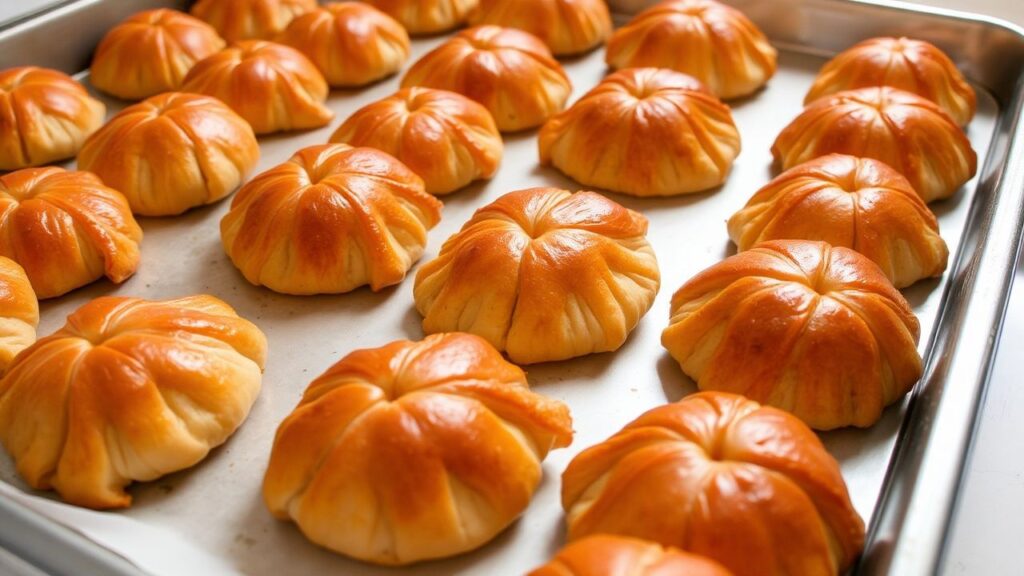
5. Optional for Baked: If baking, you can brush the tops of the shaped piroshki with an egg wash (one egg beaten with a tablespoon of milk or water) for a golden, glossy finish. You can also make a small slit on top to allow steam to escape.
The Culmination: Baking or Frying to Perfection
The final act in the piroshki creation is its transformation through heat. Whether baked to a golden crisp or fried to a delightful crunch, this stage is where the magic truly happens.
Baking the Piroshki
1. Preheat your oven to 375°F (190°C). Line baking sheets with parchment paper.
2. Place the shaped piroshki onto the prepared baking sheets, leaving a little space between them.
3. Bake for 20-25 minutes, or until the piroshki are golden brown and puffed up.
4. Allow to cool slightly on a wire rack before serving.
Frying the Piroshki
1. Heat about 1-1.5 inches (2.5-4 cm) of neutral oil (like vegetable, canola, or sunflower oil) in a deep skillet or Dutch oven to 350-360°F (175-180°C). It is crucial to maintain a consistent oil temperature.
2. Carefully lower 2-3 piroshki at a time into the hot oil, ensuring not to overcrowd the pan.
3. Fry for 3-5 minutes per side, or until deeply golden brown and puffed.
4. Using a slotted spoon, remove the fried piroshki and place them on a wire rack set over paper towels to drain excess oil. This step is vital for achieving a crisp, non-greasy finish.
A fascinating case study in the enduring appeal of piroshki can be seen in the culinary traditions of the Russian diaspora. In cities like Brighton Beach, New York, where a significant Russian-speaking population resides, traditional bakeries and cafés meticulously recreate these beloved pastries. The success of establishments like “Piroshki” (a chain with multiple locations) highlights not just a nostalgic connection but a genuine appreciation for the quality and comfort these hand-held delights provide. Their commitment to authentic dough recipes and well-seasoned fillings ensures that the piroshki remain a sought-after item, proving that the demand for well-executed, traditional comfort food is far from waning.
Nutritional Insights: A Wholesome Indulgence
While piroshki are undeniably a treat, understanding their nutritional profile can help in moderation. This information is approximate and can vary based on exact ingredients and portion sizes.
Approximate Nutritional Information per Baked Piroshki (1 of 12):
- Calories: 250-300 kcal
- Protein: 10-12g
- Fat: 12-15g
- Saturated Fat: 5-7g
- Carbohydrates: 25-30g
- Fiber: 1-2g
- Sugars: 3-5g
- Sodium: 200-300mg
Approximate Nutritional Information per Fried Piroshki (1 of 16):
- Calories: 300-350 kcal
- Protein: 9-11g
- Fat: 15-18g
- Saturated Fat: 6-8g
- Carbohydrates: 20-25g
- Fiber: 1g
- Sugars: 2-4g
- Sodium: 180-280mg
Keep in mind that the nutritional content can be influenced by the fat content of the ground beef, the amount of butter used in the dough, and the method of cooking. Opting for leaner ground beef and a baked preparation will generally result in a lighter version.
Expert Pro-Tips for Elevated Piroshki
To transcend from a good piroshki to an extraordinary one, consider these refined techniques and ingredient enhancements. These are the nuances that distinguish a home cook’s delight from a chef’s masterpiece.
💡 Expert Insight
Expert Insight: The Umami Boost.
For an unparalleled depth of flavor in the beef filling, consider incorporating a small amount of finely grated Parmesan cheese or a teaspoon of Worcestershire sauce into the cooked beef mixture. These additions introduce a subtle umami complexity that elevates the savory notes without overpowering the essence of the beef. This is particularly effective in baked piroshki where the flavors have time to meld.
Beyond the core ingredients, the quality of your beef truly matters. While 80/20 is often cited for its flavor, don’t shy away from exploring blends that might include a touch of pork for added richness and moisture. The onion and garlic are not mere aromatics but building blocks of flavor; ensure they are finely minced and cooked until sweet and translucent to avoid any harshness. The herbs, too, play a significant role. While dill is classic, consider a touch of fresh thyme or even a hint of marjoram for a different aromatic profile. The key is balance; you want to enhance the beef, not mask it.
When it comes to shaping, a consistent size ensures even cooking. For fried piroshki, a slightly thicker dough can be beneficial, as it provides a better buffer against the intense heat of the oil, preventing the filling from overcooking before the dough is perfectly golden. The sealing process for fried piroshki cannot be overstated; a weak seal is an invitation for culinary disaster, leading to a messy pan and potentially dry filling.
⚠️ Pro-Caution
Pro-Caution: The Peril of Overcrowding the Fryer.
When frying piroshki, resist the temptation to crowd the pan. Overcrowding the hot oil will cause the temperature to plummet, resulting in greasy, unevenly cooked piroshki that are pale and soggy. Fry in small batches, allowing each piroshki ample space to cook properly and maintain the optimal oil temperature. This ensures a beautiful, crisp exterior and a perfectly cooked interior.
The choice between baking and frying is not merely a matter of preference; it’s a divergence in textural experience. Baked piroshki offer a comforting, tender crumb that is subtly sweet and yielding, making them ideal for a lighter, more elegant presentation. Fried piroshki, on the other hand, deliver an unadulterated, satisfying crunch that is addictive and robust, perfect for a hearty snack or a more casual gathering. Both methods, when executed with care, yield a delightful result, but they cater to different palates and occasions. Understanding this distinction allows for a more informed choice and a more successful outcome.
Conclusion: A Legacy of Comfort and Craft
The Russian beef piroshki, in its baked or fried glory, is far more than a simple pastry. It is a culinary artifact, a vessel of tradition, and proof of the enduring power of well-crafted comfort food. From the careful kneading of the dough to the savory symphony of the filling, each step in its creation is an opportunity to connect with a rich culinary heritage. Whether you are a seasoned baker or a novice cook, embarking on the journey of making piroshki is a rewarding endeavor that promises not only delicious results but also a deeper appreciation for the artistry found in everyday cuisine. Embrace the process, savor the aroma, and most importantly, enjoy the unparalleled satisfaction of biting into a perfectly made piroshki.
Frequently Asked Questions about Piroshki
What is the best type of beef to use for piroshki filling?
Can I make piroshki ahead of time?
What are some common variations of piroshki fillings?
How do I ensure my fried piroshki aren’t greasy?
See also: Piroshki


