In the heart of every kitchen, there’s a kind of magic that happens when flour meets sugar, and eggs embrace cocoa – a dance of ingredients that transforms simple staples into something extraordinary. Few recipes capture this enchantment quite like the red velvet cake: a velvety symphony of rich flavors, vibrant hues, and tender crumb. “Whisking Wonders: Baking a Red Velvet Cake Together” invites you to embark on a culinary journey where collaboration and creativity blend seamlessly. Whether you’re a seasoned baker or a curious novice, join us as we unravel the secrets behind this beloved confection, sharing tips, tricks, and the joy of turning ordinary moments into sweet memories – one whisk, one fold, and one slice at a time.
Whisking Wonders: Baking a Red Velvet Cake Together
Whisking Wonders: Baking a Red Velvet Cake Together invites you into a world where the magic of mixing and the joy of baking culminate in a stunning, velvety dessert that’s both a feast for the eyes and the palate. This classic American cake, rooted in Southern tradition, carries a richness that’s both nostalgic and striking, punctuated by its signature vibrant red hue and subtle cocoa undertones. Whether this is your first time blending these ingredients or you’re looking to refine your technique, this guide promises a fulfilling, joyous baking experience that transforms every step into a shared celebration of flavor and texture.
Prep and Cook Time
- Preparation: 20 minutes
- Baking: 30 minutes
- Cooling and Frosting: 40 minutes
- Total Time: 1 hour 30 minutes
Yield
Serves 10-12 slices
Difficulty Level
Medium – Great for bakers with some familiarity, perfect for baking enthusiasts ready to explore layered cakes.
Ingredients
- 2 ½ cups all-purpose flour, sifted
- 1 ½ cups granulated sugar
- 1 teaspoon baking soda
- 1 teaspoon fine salt
- 1 teaspoon cocoa powder, unsweetened
- 1 ½ cups vegetable oil
- 1 cup buttermilk, room temperature
- 2 large eggs, room temperature
- 2 tablespoons red food coloring (gel recommended)
- 1 teaspoon vanilla extract
- 1 teaspoon white vinegar
- ¾ cup cream cheese, softened (for frosting)
- ½ cup unsalted butter, softened (for frosting)
- 4 cups powdered sugar, sifted (for frosting)
- 1 teaspoon vanilla extract (for frosting)
Instructions
- Prepare Your Pans and Preheat the Oven: Grease two 9-inch round cake pans and line the bottoms with parchment paper. Preheat your oven to 350°F (175°C) to ensure an even bake from the start.
- Mix the Dry Ingredients: In a large bowl, whisk together sifted flour, sugar, baking soda, salt, and cocoa powder. This ensures even distribution of the cocoa and leavening agents, vital for the perfect crumb.
- Combine the Wet Ingredients: In a separate bowl, whisk the vegetable oil, buttermilk, eggs, red food coloring, vanilla extract, and vinegar until smoothly blended and vibrantly red.
- Blend Wet into Dry: Slowly add the wet mixture to the dry ingredients, mixing gently with a spatula or whisk. Stir just until smooth; overmixing can lead to a dense texture. Aim for a luscious, thick batter that flows easily.
- Pour and Bake: Divide the batter evenly between the prepared pans. Tap the pans lightly on the counter to release air bubbles. Bake for 30 minutes, or until a toothpick inserted near the center comes out clean but moist with crumbs.
- Cool Completely: Allow cakes to rest for 10 minutes in pans, then turn them out onto wire racks to cool thoroughly. This step is essential; frosting warm cake causes melting and sliding layers.
- Craft the Cream Cheese Frosting: Beat the softened cream cheese and butter until creamy and light. Gradually add the powdered sugar while beating on low speed to avoid sugar clouds. Add vanilla extract and beat until smooth and spreadable.
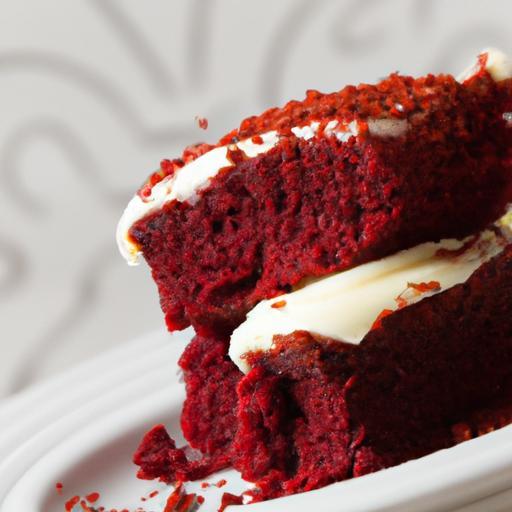
- Assemble the Cake: Place one cake layer on your serving plate. Spread a generous layer of cream cheese frosting evenly. Top with the second cake layer, then frost the top and sides with the remaining frosting. For a beautiful finish, create swirls or smooth with an offset spatula.
Tips for Success
- Ingredient Temperature Matters: Ensure all wet ingredients are at room temperature for seamless blending and optimal rising.
- Use Gel Food Coloring: This prevents thinning the batter and retains a vibrant red color without added liquid.
- Avoid Overmixing: Mixing just until combined preserves the delicate crumb structure, lending that signature moistness.
- Make-Ahead Tip: Freeze the unfrosted cake layers tightly wrapped for up to two weeks, then thaw overnight in the refrigerator before frosting.
- Substitution: Buttermilk can be replaced with plain yogurt thinned with a little milk to maintain the acidity that activates the baking soda.
Serving Suggestions
Present your red velvet masterpiece garnished with fresh raspberries or strawberries for a burst of color and tartness. A dusting of edible rose petals or finely chopped toasted pecans on top adds elegance and crunch. Serve slices slightly chilled alongside a cup of rich coffee or a glass of cold milk to balance the creamy, tangy frosting.
| Nutritional Information (per slice) | Calories | Protein | Carbs | Fat |
|---|---|---|---|---|
| Red Velvet Cake with Cream Cheese Frosting | 370 kcal | 5 g | 45 g | 18 g |
For more delightful cake inspirations, explore our Classic Cakes Collection. To deepen your understanding of baking science and ingredient functions, check out King Arthur Baking’s Ingredient Guides.

Q&A
Q&A: Whisking Wonders – Baking a Red Velvet Cake Together
Q1: What makes a red velvet cake truly special compared to other cakes?
A1: Red velvet cake is a lovely swirl of charm and tradition-its signature deep red hue paired with a delicate cocoa flavor and a whisper of tangy buttermilk makes it stand apart. It’s not just a cake; it’s an experience that balances richness with a velvet-smooth texture, perfect for celebrations or cozy gatherings.
Q2: Why is baking a red velvet cake together such a wonderful activity?
A2: Baking together transforms a simple recipe into a shared adventure. Measuring, whisking, and folding ingredients side-by-side creates connection, conversation, and joyful anticipation as you watch flour and cocoa merge into velvet dreams. It’s not only about the cake; it’s about the memories mixed into every bite.
Q3: What are the key ingredients that bring a red velvet cake to life?
A3: The magic mix of red velvet begins with flour, sugar, cocoa powder, buttermilk, and of course, that fiery red food coloring which paints its iconic blush. A dash of vinegar meets baking soda to create a gentle lift, and eggs add richness and structure. The final flourish-cream cheese frosting-wraps it all in silky sweetness.
Q4: Can you share a baking tip for achieving the perfect cake texture?
A4: Absolutely! The secret lies in gentle mixing. Over-whisking can toughen the crumb, so fold your dry ingredients softly into the wet until just combined-no more than that. Also, room temperature ingredients blend more harmoniously, crafting that tender, melt-in-your-mouth feel.
Q5: How do you know when a red velvet cake is baked just right?
A5: Visual cues are your friends: the edges will start to pull away slightly from the pan, and the surface should be springy to the touch. For the gold standard, a toothpick inserted in the center should come out with a few moist crumbs but no wet batter. Patience in cooling ensures clean slicing and frosting perfection.
Q6: What’s the best way to decorate a red velvet cake for a shared celebration?
A6: Keep it classic with a smooth cream cheese frosting, glowing like soft snow over the vivid red. Sprinkle a handful of cake crumbs or finely chopped nuts for texture. For a whimsical twist, add fresh berries or edible flowers, turning your baked wonder into a centerpiece that’s as delicious to look at as it is to eat.
Q7: Any final thoughts on the joy of baking a red velvet cake together?
A7: Baking a red velvet cake together is more than following a recipe-it’s creating warmth, laughter, and a sense of accomplishment. Each step, from whisk to frosting swirl, knits stories into the layers. So, gather your loved ones, ignite your ovens, and let the whisking wonders begin!
Future Outlook
As the final dusting of powdered sugar settles over your freshly baked red velvet masterpiece, the true magic of the process becomes clear: it’s not just about mixing ingredients or following a recipe-it’s about the shared moments, the laughter in the kitchen, and the joy that rises alongside the cake. Baking a red velvet cake together transforms a simple dessert into an unforgettable experience, a sweet testament to collaboration, patience, and creativity. So next time you gather your loved ones, remember that the wonders of whisking go far beyond the batter-they’re found in every beat of the heart and every smile shared over a slice. Happy baking!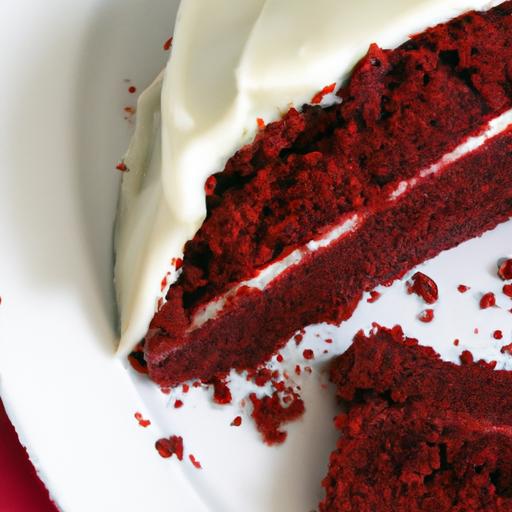


