The aroma of freshly fried chicken, a universal siren call to comfort and indulgence, takes on a distinct, addictive allure when it hails from Korea. More than just a dish, Korean fried chicken, or *chikin* as it’s affectionately known, is a cultural phenomenon. It’s the ubiquitous accompaniment to late-night dramas, the star of bustling street food stalls, and the coveted centerpiece of celebratory gatherings. Achieving that legendary, shatteringly crisp exterior and succulently tender interior at home can feel like a culinary Everest. This isn’t about simply coating chicken in batter and frying it; it’s a meticulous dance of ingredients, temperatures, and techniques that elevate humble poultry to an art form. This guide demystifies this iconic dish, unlocking the secrets to crafting Korean Chicken that rivals the very best, right in your own kitchen.
- Unveiling the Ingredient Arsenal: Crafting Your Korean Chicken Masterpiece
- The Ritual of Preparation: Transforming Raw to Radiant
- Step 1: The Marination Ritual (Minimum 30 minutes, ideally 2-4 hours)
- Step 2: The Coating Ceremony (Just before frying)
- Step 3: The First Fry: Setting the Stage (170°C / 340°F)
- Step 4: The Glaze Alchemy
- Step 5: The Second Fry: The Golden Finale (185°C / 365°F)
- Step 6: The Glazing Embrace
- Nutritional Snapshot: A Calculated Indulgence
- Elevating Your Korean Chicken Game: Expert Pro-Tips
- 💡 Expert Insight Expert Insight: The Importance of Oil Temperature and Freshness
- The Double-Dip Advantage
- Sauce Application: A Delicate Balance
- Frequently Asked Questions
### At a Glance: The Pillars of Perfect Korean Chicken
* Double Frying is Non-Negotiable: This technique is the cornerstone of achieving the signature, almost glass-like crispiness that defines authentic Korean fried chicken.
* The Power of the Marinade: Beyond mere seasoning, a well-balanced marinade infuses the chicken with depth of flavor and contributes to tenderness.
* Cornstarch is King: For that unparalleled crunch, a precise cornstarch-based coating is far superior to traditional flour.
* Sauce as the Crown Jewel: The glaze is not an afterthought; it’s an integral component that complements, rather than compromises, the chicken’s crispiness.
Korean fried chicken distinguishes itself from its Western counterparts through a confluence of factors, rooted in a culinary philosophy that prioritizes textural contrast and layered flavor. Unlike American fried chicken, which often relies on a thick, fluffy batter, Korean *chikin* typically employs a lighter coating, primarily cornstarch, designed to create a delicate, brittle shell. This allows the inherent flavor of the chicken to shine through while providing an incredible crunch that remains satisfying even hours after frying. Furthermore, the double-frying method, a technique honed over generations, is crucial. The first fry cooks the chicken through and sets the coating, while the second, hotter fry crisps it to perfection. This process, coupled with strategic marinades and distinctive sauces, creates a symphony of textures and tastes that has captivated palates worldwide. For instance, the fried chicken market in South Korea alone exceeded 7 trillion KRW (approximately $5.5 billion USD) in 2022, underscoring immense popularity and consumer demand for quality driven by the pursuit of that perfect, elusive crisp.
Unveiling the Ingredient Arsenal: Crafting Your Korean Chicken Masterpiece
The foundation of exceptional Korean Chicken lies in the quality of its components. While the process might seem complex, a thoughtful selection of ingredients ensures success. This recipe focuses on a classic sweet and spicy glaze, a beloved iteration of this versatile dish.
For the Chicken:
- Chicken Pieces: 1 kg (approx. 2.2 lbs) chicken thighs or drumsticks, bone-in, skin-on. Thighs offer superior moisture and flavor, while drumsticks are easier to handle.
- Marinade:
- 2 tablespoons soy sauce
- 1 tablespoon mirin (Japanese rice wine)
- 1 tablespoon grated fresh ginger
- 2 cloves garlic, minced
- ½ teaspoon black pepper
- Pinch of salt
- Coating:
- 1 cup (120g) cornstarch (cornflour in the UK)
- ¼ cup (30g) potato starch (optional, for extra crispiness)
- 1 teaspoon salt
- ½ teaspoon black pepper
- Frying Oil: 4-6 cups (960ml – 1.4L) neutral-flavored oil with a high smoke point, such as canola, vegetable, or peanut oil.
For the Sweet & Spicy Glaze:
- 2 tablespoons gochujang (Korean chili paste)
- 2 tablespoons ketchup
- 2 tablespoons honey or corn syrup
- 1 tablespoon soy sauce
- 1 tablespoon rice vinegar
- 1 tablespoon mirin
- 1 teaspoon minced garlic
- ½ teaspoon grated fresh ginger
- 1 tablespoon water (or more, to adjust consistency)
- Sesame seeds and chopped scallions, for garnish (optional)
The Ritual of Preparation: Transforming Raw to Radiant
Patience and precision are your allies in this stage. Each step is designed to build the perfect texture and flavor profile.
Step 1: The Marination Ritual (Minimum 30 minutes, ideally 2-4 hours)
Begin by preparing the chicken. If using thighs, you can leave them whole or cut them into 2-3 bite-sized pieces. For drumsticks, ensure they are clean and patted dry. In a large bowl, combine all the marinade ingredients: soy sauce, mirin, grated ginger, minced garlic, black pepper, and a pinch of salt. Add the chicken pieces to the bowl and toss thoroughly to ensure each piece is evenly coated. Cover the bowl and refrigerate for at least 30 minutes, but for optimal flavor penetration, aim for 2 to 4 hours. This allows the salt and aromatics to tenderize the meat and infuse it with foundational flavor.
Step 2: The Coating Ceremony (Just before frying)
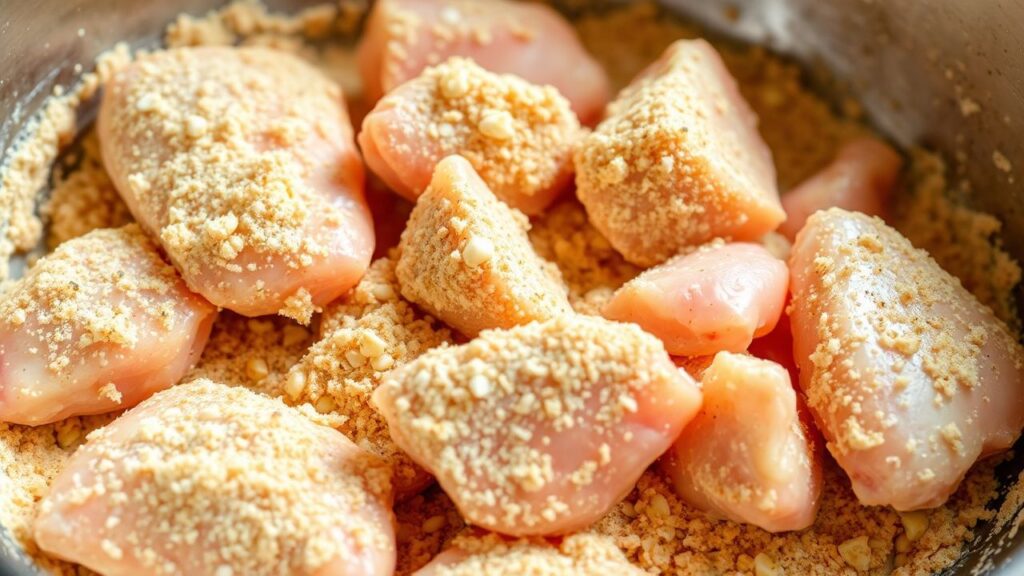
In a separate shallow dish or a large zip-top bag, whisk together the cornstarch, potato starch (if using), salt, and black pepper. This blend is critical for achieving that signature crunch. Cornstarch, with its low gelatinization temperature, crisps up beautifully and creates a lighter coating than wheat flour, which can become dense and chewy. Potato starch further enhances this brittle texture. Once the chicken has finished marinating, remove it from the marinade, allowing any excess to drip off. Working in batches, dredge each chicken piece thoroughly in the cornstarch mixture, ensuring it’s completely coated. Press the coating onto the chicken to help it adhere. A good coating is neither too thick nor too thin; it should create a fine, even layer.
Step 3: The First Fry: Setting the Stage (170°C / 340°F)
Heat your frying oil in a heavy-bottomed pot or deep fryer to 170°C (340°F). It’s crucial to maintain a consistent oil temperature for even cooking. Use a thermometer to monitor this carefully. Carefully add the coated chicken pieces to the hot oil, ensuring not to overcrowd the pot. Overcrowding will lower the oil temperature drastically, resulting in greasy, soggy chicken. Fry in batches for about 6-8 minutes, until the chicken is cooked through and the coating is set but not yet deeply golden. The goal here is to cook the chicken and firm up the exterior. Remove the chicken from the oil and place it on a wire rack set over a baking sheet to drain. This allows air to circulate, preventing steam from softening the coating.
Step 4: The Glaze Alchemy
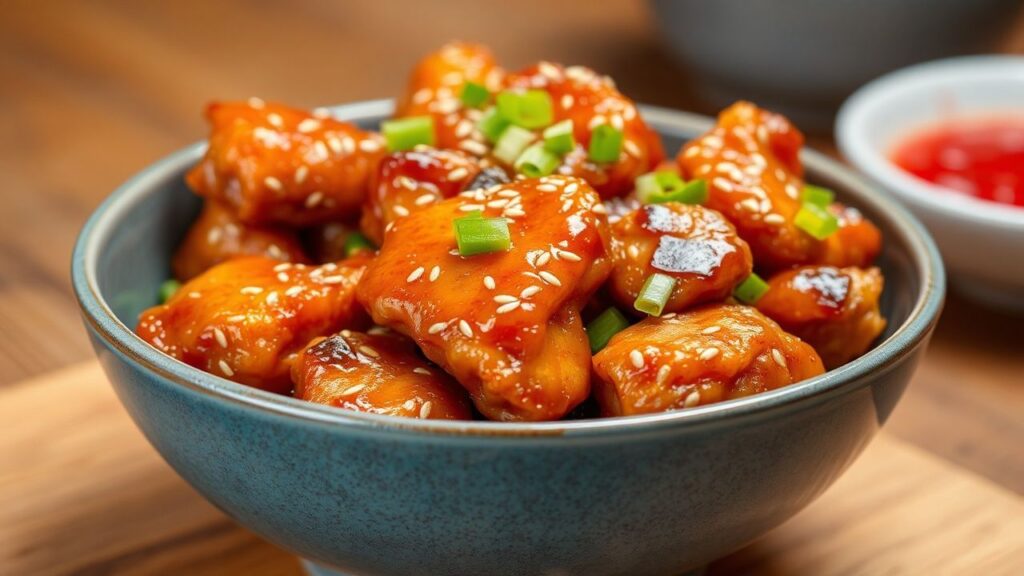
While the first batch of chicken is resting, prepare the glaze. In a medium saucepan, combine the gochujang, ketchup, honey (or corn syrup), soy sauce, rice vinegar, mirin, minced garlic, grated ginger, and water. Bring the mixture to a gentle simmer over medium heat, stirring constantly. Cook for 3-5 minutes, or until the glaze has thickened slightly to a syrupy consistency. If the glaze becomes too thick, add a teaspoon of water at a time until it reaches your desired coating consistency. A well-balanced glaze should be glossy and cling to the chicken without being overly sticky or watery. This sauce, with its characteristic blend of sweet, savory, and spicy notes, is a hallmark of Korean cuisine, drawing parallels to the complex flavor profiles found in dishes like bibimbap.
Step 5: The Second Fry: The Golden Finale (185°C / 365°F)
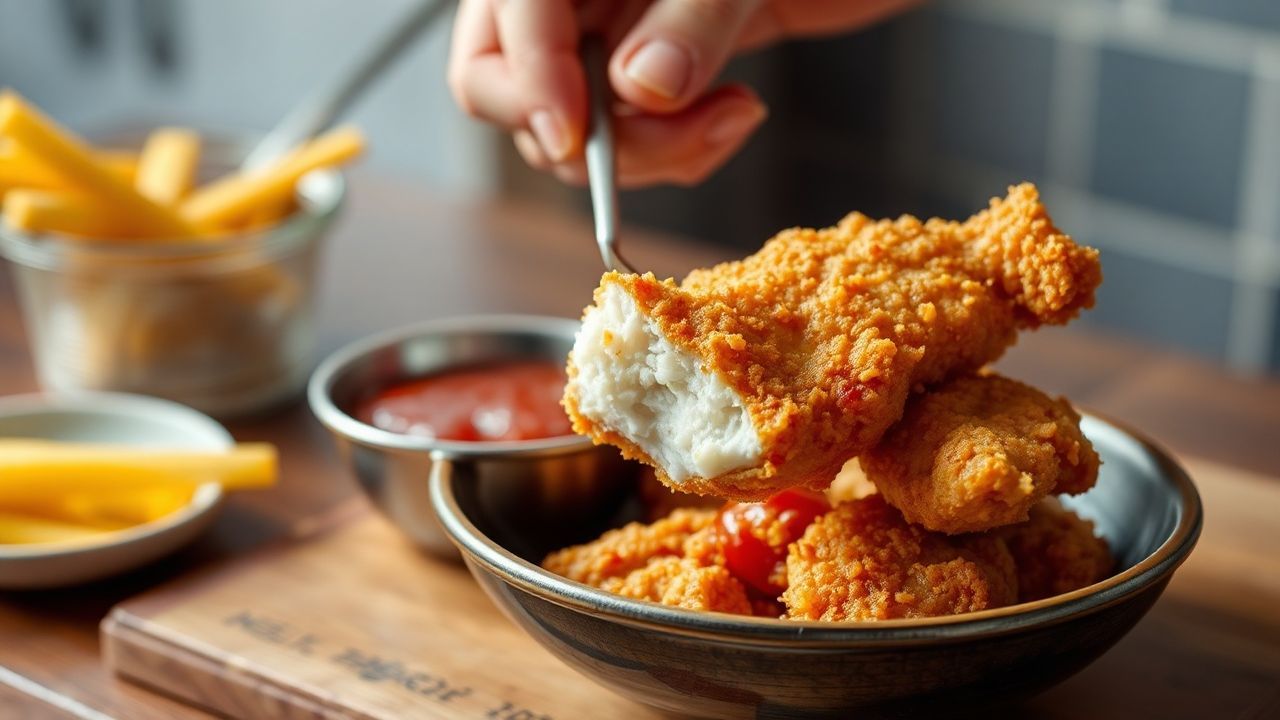
Increase the oil temperature to 185°C (365°F). This higher temperature is key to achieving that ultimate crispiness. Carefully return the partially fried chicken to the hot oil, again in batches, and fry for an additional 2-4 minutes, or until the chicken is deeply golden brown and shatteringly crisp. This second fry renders out any remaining moisture and creates the signature glass-like texture. Remove the chicken from the oil and place it back on the wire rack to drain for a minute or two. This brief draining period is essential to prevent the glaze from making the chicken soggy.
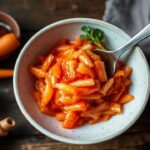
Step 6: The Glazing Embrace
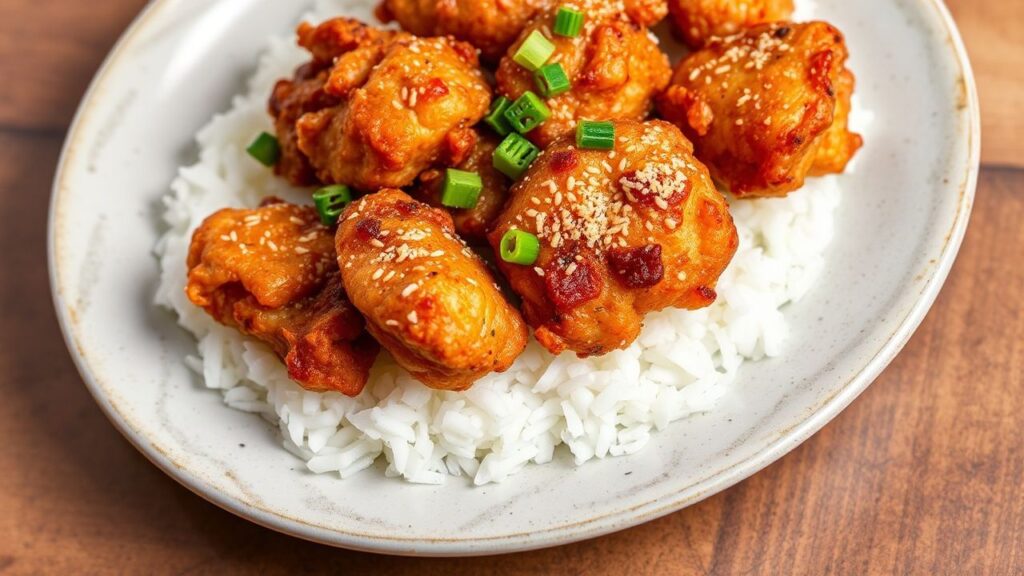
Transfer the hot, crispy chicken pieces to a large bowl. Pour the prepared glaze over the chicken. Gently toss the chicken to ensure each piece is evenly coated in the glistening sauce. Work quickly but carefully to maintain the crispness of the chicken. Serve immediately, garnished with toasted sesame seeds and chopped scallions if desired. This final step is where the magic happens, transforming the crispy chicken into the iconic Korean fried chicken. For an additional layer of texture and visual appeal, consider a light sprinkle of finely chopped peanuts. This technique is often seen in restaurants that prioritize presentation as much as flavor.
Nutritional Snapshot: A Calculated Indulgence
While undeniably a treat, understanding the nutritional profile of your homemade Korean Chicken can help you enjoy it mindfully. Please note that these are approximate values and can vary based on the exact ingredients and portion sizes used.
Serving Size: Approximately 1/4 of the recipe (about 2-3 pieces)
| Nutrient | Amount |
|---|---|
| Calories | 550-650 kcal |
| Protein | 30-35 g |
| Fat | 30-40 g |
| Saturated Fat | 8-10 g |
| Carbohydrates | 35-45 g |
| Sugars | 15-20 g |
| Sodium | 800-1000 mg |
The fat content is primarily from the frying process and the chicken skin. The sugar content comes from the glaze ingredients like honey and ketchup. To mitigate sodium, consider using a low-sodium soy sauce. For a slightly healthier rendition, one could experiment with air-frying techniques, though Keep in mind that this will alter the texture significantly from the authentic double-fried method. Exploring recipes for lighter fare can offer alternative approaches.
Elevating Your Korean Chicken Game: Expert Pro-Tips
Achieving true restaurant-quality Korean Chicken at home is within reach with these insider techniques.
💡 Expert Insight
Expert Insight: The Importance of Oil Temperature and Freshness
The single most critical factor for achieving perfect crispiness is maintaining the correct oil temperature throughout the frying process. For the first fry, 170°C (340°F) is ideal for cooking the chicken through without burning the exterior. The subsequent increase to 185°C (365°F) for the second fry is what crisps the coating to that glass-like finish. If your oil temperature fluctuates wildly, you risk either undercooked chicken or a burnt, bitter coating. Furthermore, use fresh oil for each batch of frying if possible, or at least filter your oil between batches to remove any burnt bits that can impart off-flavors and accelerate the breakdown of the oil.
The Double-Dip Advantage
For an even more robust crust, consider a double-coating method. After the initial dredging in the cornstarch mixture, dip the chicken pieces briefly in a light batter (e.g., water mixed with a tablespoon of cornstarch) and then dredge them again in the cornstarch mixture. This builds a slightly thicker, more textured coating that can achieve an exceptional crunch. This technique is often employed by culinary professionals aiming for maximum textural impact.
Never overcrowd your frying pot. Adding too many pieces of chicken at once will cause the oil temperature to plummet, preventing the chicken from frying properly. Instead, it will steam in the oil, leading to a greasy, limp coating. This is a common pitfall for home cooks and directly compromises the desired crispiness. Work in small, manageable batches, allowing each piece sufficient space to fry efficiently and evenly. Patience here yields a far superior result.
Sauce Application: A Delicate Balance
The timing and method of applying the glaze are paramount. Tossing the chicken in the glaze immediately after the second fry, while it’s still piping hot, allows the sauce to adhere beautifully. However, letting it sit too long allows the moisture from the sauce to soften the crisp crust. For those who prefer their chicken exceptionally crisp for a longer period, consider serving the glaze on the side or drizzling it over just before serving. This nuanced approach is often debated among food enthusiasts.
Frequently Asked Questions
What kind of chicken cut is best for Korean fried chicken?
Bone-in, skin-on chicken thighs are generally considered the best choice for Korean fried chicken due to their higher fat content, which keeps the meat incredibly moist and flavorful during the frying process. Drumsticks are also an excellent option, offering ease of handling and a satisfying bite. While chicken wings can be used, they require a slightly shorter frying time. The skin is essential for achieving that signature crispiness and adds a rich flavor.
Can I make Korean fried chicken ahead of time?
Korean fried chicken is best enjoyed immediately after it’s made. The crispiness is ephemeral and begins to degrade as the chicken cools and sits in the sauce. If you absolutely must prepare it in advance, you can fry the chicken pieces and let them cool completely before storing them in an airtight container in the refrigerator. Reheat them in a hot oven (around 200°C/400°F) for 5-10 minutes to restore some crispiness before tossing them in the glaze. However, the texture will not be quite as pristine as freshly fried chicken.
What are the essential components of a traditional Korean fried chicken sauce?
Traditional Korean fried chicken sauces are characterized by a balance of sweet, savory, and spicy elements. The cornerstone is often gochujang (Korean chili paste), which provides a deep, fermented heat and a vibrant red hue. This is typically balanced with ingredients like soy sauce for saltiness and umami, honey or corn syrup for sweetness and gloss, and often garlic and ginger for aromatic depth. Rice vinegar can add a touch of acidity to cut through the richness. Variations exist, from a milder soy-garlic glaze to a spicier, more intense gochugaru-based sauce, showcasing the versatility of this beloved dish.
See also: Korean Chicken
