“The simple pleasure of dipping a piece of warm pita into a bowl of perfectly made hummus is one of life’s understated joys.” – Yotam Ottolenghi
Hummus, a staple of Middle Eastern cuisine, transcends mere sustenance; it is a culinary ambassador, a symbol of hospitality, and proof of the transformative power of simple ingredients. For centuries, this humble chickpea and tahini purée has graced tables, offering a creamy, nutty, and deeply satisfying flavor profile that resonates across cultures. Yet, achieving that truly *authentic* hummus – the kind with an almost impossibly smooth texture and a vibrant, balanced taste – often feels like an elusive goal for home cooks. Many recipes promise perfection, but few deliver the nuanced understanding and meticulous technique required. This guide aims to demystify the process, drawing upon years of experience and culinary tradition to equip you with the knowledge and actionable steps to create hummus that is not just good, but genuinely extraordinary.
Hummus is more than a dip; it’s a cultural cornerstone, proof of how humble ingredients, when treated with respect and skill, can create something universally beloved and profoundly satisfying.
Hummus has a rich and debated history, with its origins often traced back to the Levant region. While precise origins are difficult to pinpoint, archaeological evidence and historical texts suggest its presence in the region for many centuries. Some scholars point to ancient Egyptian texts referencing chickpea-based dishes, though the inclusion of tahini as a core component is a more recent development. Regardless of its precise genesis, its enduring popularity is undeniable. According to a report by Grand View Research, the global hummus market was valued at USD 1.5 billion in 2022 and is projected to grow, reflecting its widespread appeal and increasing presence in Western diets.
The Foundation of Authentic Hummus: Ingredient Selection
The pursuit of superior hummus begins with a discerning eye for quality ingredients. While the ingredient list appears deceptively simple – chickpeas, tahini, lemon juice, garlic, salt, and water – the caliber of each component dictates the final outcome. This is not a dish where shortcuts significantly improve the result; rather, meticulous selection and preparation are paramount.
Chickpeas: The Heart of the Matter
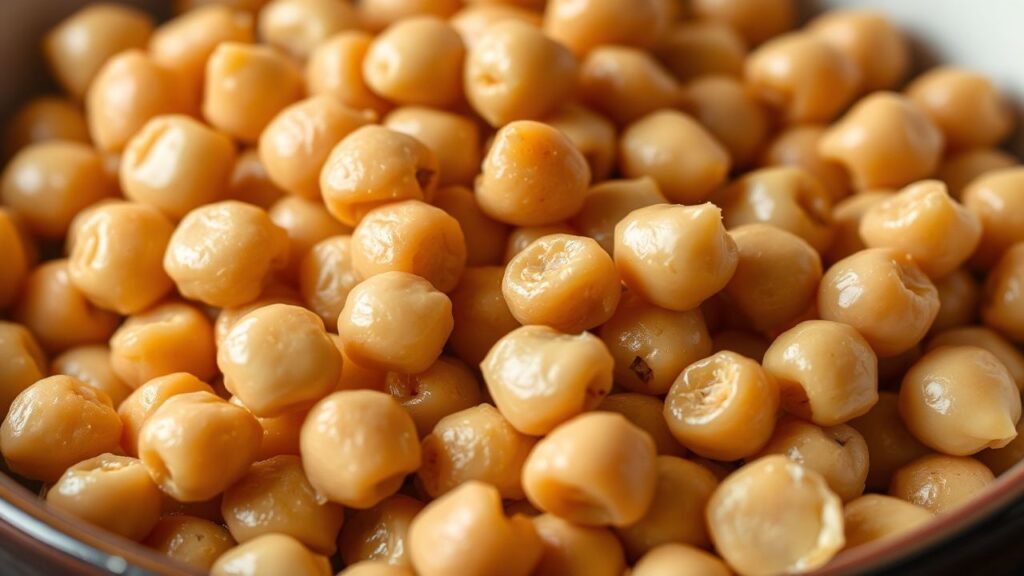
The type and preparation of your chickpeas are arguably the most critical factors in achieving a silky-smooth hummus. While canned chickpeas are convenient, they often lack the ideal texture and can impart a subtle, sometimes metallic, aftertaste. For the most authentic and luxurious hummus, dried chickpeas are indispensable.
- Choosing Dried Chickpeas: Opt for high-quality, fresh dried chickpeas. Older chickpeas require longer soaking and cooking times and may still not yield the desired tenderness. Look for chickpeas with a uniform color and no signs of damage or infestation.
- The Soaking Ritual: Soaking is a non-negotiable step. A minimum of 8-12 hours, or preferably overnight, is required. This rehydrates the chickpeas, initiating the softening process and reducing cooking time. Some chefs advocate for a double-soak method: soak for 8-12 hours, drain, rinse, and then soak again for another 4-8 hours. This can further enhance tenderness.
- The Crucial Cooking Phase: This is where many home cooks falter. Simply boiling chickpeas until they are “cooked” is insufficient. For truly creamy hummus, chickpeas must be cooked until they are exceptionally tender, to the point of almost falling apart. This typically requires simmering for 1.5 to 3 hours, depending on the age and quality of the chickpeas and whether baking soda is used.
- The Baking Soda Secret: Adding a teaspoon of baking soda to the cooking water can dramatically accelerate the softening process and break down the chickpea’s cell walls, leading to a creamier texture. This is a technique employed by many professional chefs. Ensure you rinse the chickpeas thoroughly after cooking to remove any residual alkaline taste.
- Peeling: The Effort Worth Making: For the ultimate silken texture, consider peeling the chickpeas. This is a labor-intensive step, but the difference it makes is profound. After cooking, you can gently rub the chickpeas between your hands or use a small paring knife to slip off the skins. This removes the fibrous outer layer that can create a slightly grainy texture.
Tahini, a paste made from ground sesame seeds, provides the characteristic nutty depth and emulsifying properties of hummus. The quality of your tahini is paramount.
- Selecting High-Quality Tahini: Look for tahini that is made from 100% sesame seeds, ideally roasted. The best tahini will have a smooth, pourable consistency and a rich, slightly sweet, nutty aroma. Avoid tahini that is overly bitter or separated into a thick sediment and a layer of oil; this often indicates lower quality or older product. Brands that require vigorous stirring to recombine the oil and paste are often a good sign of quality.
- The Role of Tahini: Tahini acts as a binder and emulsifier, creating the luxurious mouthfeel that defines great hummus. It also contributes a significant portion of the flavor profile.
- Fresh Lemon Juice: Always use freshly squeezed lemon juice. Bottled juice lacks the bright, zesty notes essential for balancing the richness of the tahini and chickpeas. The acidity of the lemon juice also helps to brighten the overall flavor.
- Garlic: Fresh garlic is crucial. The intensity of raw garlic can be potent, so it’s often recommended to mince it finely and let it sit in the lemon juice for a few minutes before blending. This mellows its sharp edge. Some recipes call for roasting the garlic first for a sweeter, milder flavor, but for a classic, vibrant hummus, raw is often preferred.
- Salt: Kosher salt or sea salt is recommended for its clean flavor. The amount of salt will depend on your preference and the brininess of your tahini. It’s best to season gradually and taste as you go.
The Method: Crafting Silken Hummus
Achieving a consistently smooth and creamy hummus requires attention to detail at every stage of the blending process. The goal is to create an emulsion that is both thick and flowing, with no graininess whatsoever.
Step-by-Step Preparation Method
1. Prepare the Chickpeas: If using dried chickpeas, soak them overnight (8-12 hours) in plenty of water. Drain, rinse thoroughly, and place them in a large pot. Cover with fresh water by at least 2 inches. Bring to a boil, then reduce heat and simmer, partially covered, for 1.5 to 3 hours, or until the chickpeas are extremely tender and can be easily mashed between your fingers. Add 1 teaspoon of baking soda to the cooking water during the last hour of simmering to aid in softening. Drain the chickpeas, reserving at least 1 cup of the cooking liquid (aquafaba). If you have the time and desire for ultimate smoothness, meticulously peel the chickpeas once they have cooled slightly. 2. Prepare the Garlic and Lemon Mixture: In a small bowl, combine 2-4 cloves of minced garlic (depending on your preference for garlic intensity) with the juice of 1-2 fresh lemons.
Let this mixture sit for at least 10 minutes to allow the garlic to mellow. 3. Blend the Tahini and Lemon-Garlic Mixture: In the bowl of a food processor, combine 1 cup of high-quality tahini with the lemon-garlic mixture. Process for 1-2 minutes, scraping down the sides of the bowl as needed, until the mixture is smooth and creamy. This step is crucial for creating a light and airy base. The mixture may appear thick or even slightly curdled; this is normal. 4. Gradually Add Chickpeas: Add about half of the cooked and drained chickpeas (or peeled chickpeas, if using) to the food processor. Process until the mixture is very smooth, scraping down the sides frequently. 5. Incorporate Aquafaba and Continue Blending: With the food processor running, slowly drizzle in about ¼ cup of the reserved chickpea cooking liquid (aquafaba). Continue to process until the mixture is smooth and creamy.
Add the remaining chickpeas and continue processing, gradually adding more aquafaba (a tablespoon at a time) until you reach your desired consistency. This may take anywhere from 5 to 10 minutes of continuous processing. The key is to keep the processor running and to add liquid slowly to create a stable emulsion.
- [TIP]Expert Insight: For an exceptionally light and airy hummus, consider using an ice-cold liquid – either water or aquafaba – when blending. The shock of the cold can help create a finer emulsion and a creamier texture.
6. Season and Refine: Add ½ to 1 teaspoon of salt (or to taste) and process again until fully incorporated. Taste and adjust seasoning as needed. If the hummus is too thick, add a little more aquafaba or cold water. If it’s too thin, continue processing; the aquafaba will help thicken it.
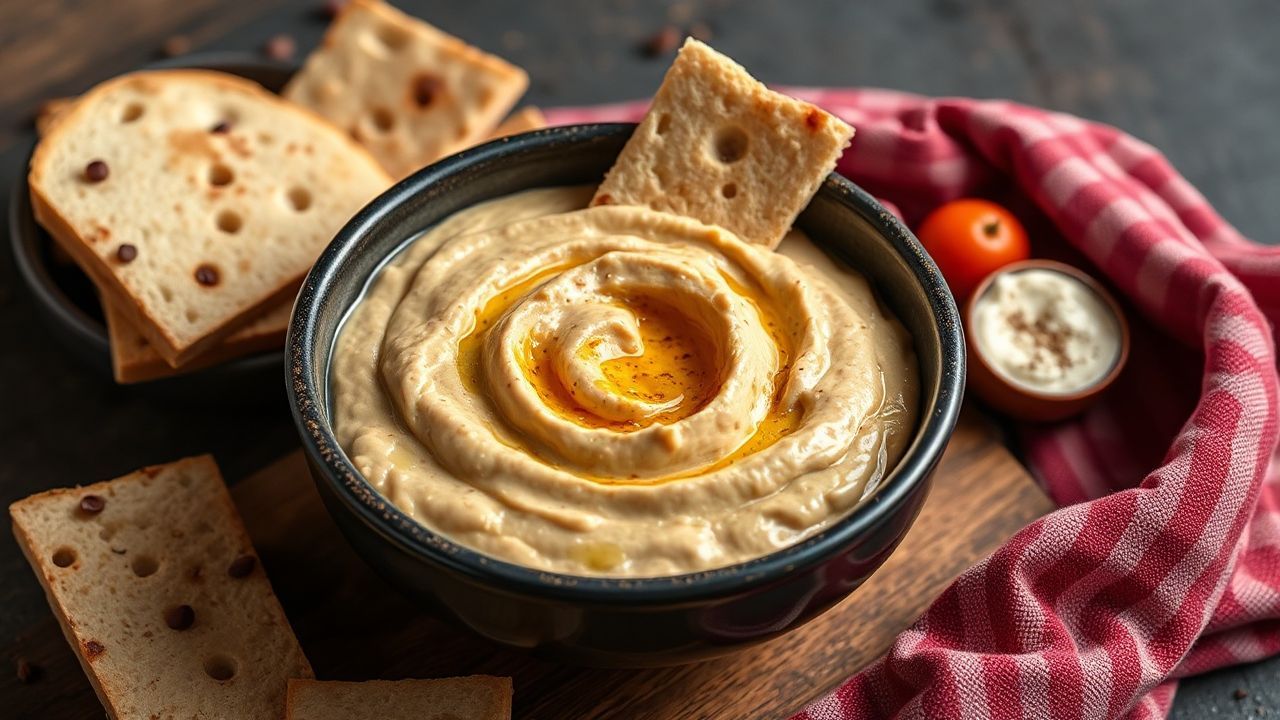
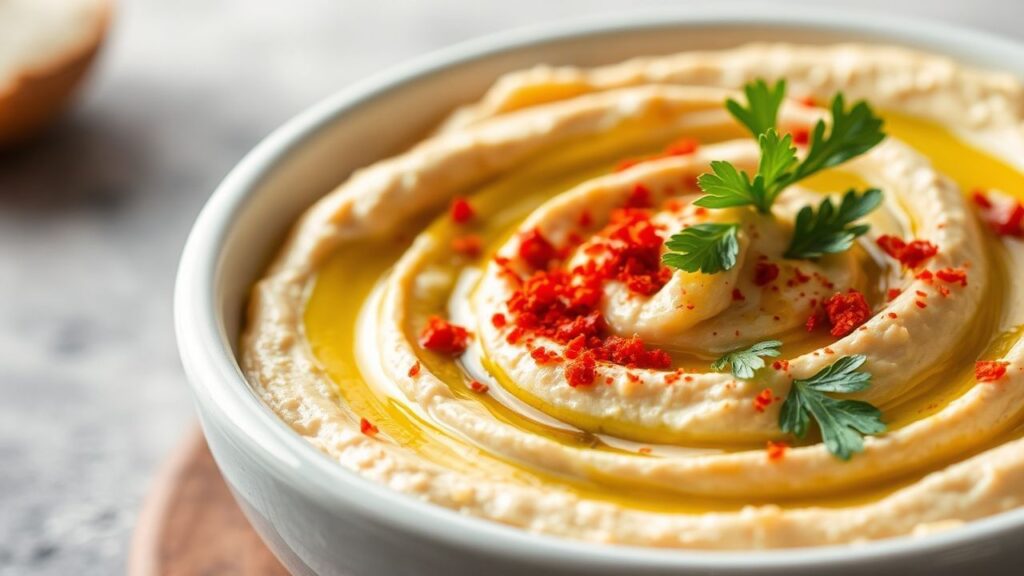
7. Serve: Transfer the hummus to a serving bowl. Create a well in the center with the back of a spoon. Drizzle generously with good-quality extra-virgin olive oil. Garnish with a sprinkle of paprika, sumac, chopped parsley, or toasted pine nuts, as desired.
Elevating Hummus: Pro-Tips for Restaurant-Quality Results
Achieving hummus that rivals that of your favorite Middle Eastern restaurant requires an understanding of subtle techniques and ingredient nuances.
The Art of the Blend
The texture of hummus is its most defining characteristic for many. The difference between grainy and silken is often in the blending process.
- Food Processor vs. Blender: While a food processor is standard, a high-powered blender (like a Vitamix or Blendtec) can often achieve an even smoother, more refined texture due to its blade design and vortex action. If using a blender, you may need to add slightly more liquid to facilitate the blending.
- Patience is Key: Do not rush the blending process. Allow the food processor or blender to work its magic for several minutes, scraping down the sides as needed. The extended blending time helps to break down any remaining chickpea solids and emulsify the ingredients thoroughly.
The Tahini-to-Chickpea Ratio
This is a matter of personal preference, but a balanced ratio is critical. Too much tahini can make the hummus heavy and overpowering; too little can leave it tasting bland and lacking depth. A good starting point is a ratio of approximately 1 cup of tahini to 2 cups of cooked chickpeas.
- [TIP]Expert Insight: For a particularly rich and authentic flavor, some chefs recommend using a tahini that has a higher oil content. When purchasing, look for tahini where the oil naturally sits on top, indicating it hasn’t been overly processed or emulsified. Stirring this oil back into the paste before use is essential.
The “Hummus Water” (Aquafaba)
The liquid in which the chickpeas are cooked, known as aquafaba, is a treasure trove of flavor and emulsifying agents. Never discard it without reserving some. It’s the secret ingredient that helps create a light, creamy, and stable hummus.
- Temperature Matters: As mentioned, using cold aquafaba can contribute to a finer emulsion.
Seasoning Nuances
Beyond salt and lemon, consider subtle additions. A pinch of cumin can add warmth and complexity, though it’s not traditional in all regions. A tiny dash of cayenne pepper can provide a very subtle, almost imperceptible heat that enhances the other flavors.
Nutritional Profile of Authentic Hummus
Hummus, when prepared with wholesome ingredients, is a nutritional powerhouse. It offers a good balance of protein, healthy fats, and complex carbohydrates.
- Per Serving (approx. ¼ cup, without garnishes):
- Calories: 150-200 kcal
- Protein: 5-7g
- Fat: 10-15g (primarily from tahini and olive oil, rich in monounsaturated fats)
- Carbohydrates: 10-15g (including dietary fiber)
- Fiber: 4-6g
- Vitamins and Minerals: Hummus is a good source of folate, iron, magnesium, phosphorus, and manganese.
The consumption of legumes, like chickpeas, has been linked to various health benefits. Research published in the *British Journal of Nutrition* suggests that incorporating legumes into the diet can help improve satiety, reduce cholesterol levels, and manage blood glucose, contributing to better metabolic health.
Common Pitfalls and How to Avoid Them
Even with the best intentions, achieving perfect hummus can be challenging. Understanding common mistakes can save you from disappointment.
- Over-reliance on Canned Chickpeas: As mentioned, while convenient, they rarely yield the superior texture of home-cooked dried chickpeas. If you must use canned, drain and rinse them thoroughly, and consider boiling them for an additional 15-20 minutes with a pinch of baking soda to improve tenderness.
- Insufficient Blending Time: This is a cardinal sin for grainy hummus. Be patient and let the food processor or blender do its work.
- Using Stale or Low-Quality Tahini: The flavor of your tahini directly translates to your hummus. Invest in a good brand.
- Adding Too Much Liquid Too Soon: Start with less liquid and add it gradually. You can always add more, but you can’t easily remove it.
- Under-seasoning: Hummus needs adequate salt and lemon juice to balance its richness. Taste and adjust.
[WARNING]Pro-Caution: While hummus is generally considered a healthy food, be mindful of portion sizes, especially if you are watching your calorie or fat intake. The addition of generous amounts of olive oil and tahini can significantly increase the calorie count. Also, individuals with sesame allergies should, of course, avoid hummus.
The Cultural Significance and Serving Traditions
Hummus is deeply ingrained in the culinary traditions of the Middle East. It’s more than just a dip; it’s a communal dish meant to be shared.
- Serving Suggestions: Authentic hummus is traditionally served in a shallow bowl, drizzled generously with extra-virgin olive oil. Common garnishes include a sprinkle of paprika, sumac, za’atar, chopped fresh parsley, a dollop of ful (fava beans), or even a scattering of cooked chickpeas.
- Accompaniments: It is almost always served with warm, fresh pita bread for dipping. Other popular accompaniments include falafel, fresh vegetables (cucumbers, carrots, bell peppers), and olives.
- Regional Variations: While this recipe focuses on a classic, authentic style, hummus varies by region. Some variations might include a touch of pine nuts, a different spice profile, or a slightly different tahini-to-chickpea ratio. For instance, some Lebanese versions are known for their exceptionally smooth texture, often achieved through meticulous peeling and extended blending.
The act of sharing a bowl of hummus is an act of connection. It is a dish that brings people together, fostering conversation and camaraderie around the table.
Frequently Asked Questions
H3: What is the secret to making hummus extra creamy?
The secret to extra creamy hummus lies in two main factors: the quality and preparation of the chickpeas, and the blending technique. Using dried chickpeas that are cooked until exceptionally tender (almost falling apart) is paramount. Some chefs recommend adding a teaspoon of baking soda to the cooking water to help break down the chickpea’s cell walls. Crucially, the blending process needs to be thorough and patient. Processing the tahini with lemon and garlic first, then gradually adding the chickpeas and reserved cooking liquid (aquafaba) while the machine is running, is key to creating a stable, silky emulsion.
H3: Can I use canned chickpeas for hummus?
While you can use canned chickpeas for hummus, they will rarely yield the same creamy, authentic texture as dried chickpeas that have been cooked from scratch. Canned chickpeas can be softer but often have a different starch content and may impart a slightly metallic or less fresh flavor. If you must use canned chickpeas, drain and rinse them very well, and consider boiling them for an additional 15-20 minutes with a pinch of baking soda to improve their texture.
H3: How long does homemade hummus last?
Homemade hummus typically lasts for 3 to 5 days when stored in an airtight container in the refrigerator. The olive oil topping can help to create a seal, preserving freshness. It’s best to avoid leaving it at room temperature for extended periods.
H3: What is the best way to store homemade hummus?
Store homemade hummus in an airtight container in the refrigerator. It is advisable to pour a thin layer of extra-virgin olive oil over the surface before sealing the container. This acts as a barrier against air, helping to prevent the hummus from drying out and oxidizing, and preserving its freshness and texture.
H3: Why is my hummus bitter?
Bitterness in hummus usually stems from the tahini or the garlic. If your tahini is old, of poor quality, or has a naturally bitter profile, it will impart that flavor to the hummus. Ensure you are using a fresh, high-quality tahini. If using raw garlic, too much of it can also create a sharp, bitter taste. Mincing the garlic and letting it steep in the lemon juice for a while before blending can help mellow its intensity. Alternatively, consider roasting the garlic for a sweeter, milder flavor.
See also: Hummus

