Kimchi, the quintessential Korean fermented staple, boasts a staggering global consumption rate that continues to climb; in 2023 alone, the market was valued at over $4 billion USD, proof of its growing popularity beyond its native shores. For many, the vibrant crimson hue and the promise of a complex, tangy, spicy, and deeply savory flavor profile evoke images of bustling Korean markets or carefully curated restaurant side dishes. Yet, the notion of replicating this culinary marvel in one’s own kitchen often conjures images of daunting complexity, requiring specialized ingredients and an intimidating level of fermentation expertise. This perception, however, is a fallacy. The truth is, a truly delicious and authentic-tasting kimchi is remarkably accessible, even for the novice home cook. This guide demystifies the process, offering a straightforward yet nuanced recipe that prioritizes ease without sacrificing the soul of this beloved fermented wonder.
- Understanding the Essence of Kimchi
- The Essential Ingredients for Your First Batch
- Core Components:
- The Flavor Paste (Yangnyeom):
- Vegetable Additions:
- Nutritional Snapshot (Per Serving – approx. 1/4 cup / 100g, estimated):
- The Step-by-Step Journey to Delicious Kimchi
- Stage 1: Salting the Cabbage – The Foundation of Texture
- Stage 2: Crafting the Flavor Paste (Yangnyeom)
- Stage 3: Assembling and Fermenting Your Kimchi
- Expert Pro-Tips for Elevated Kimchi
- The Art of Enjoying Your Homemade Kimchi
- Frequently Asked Questions About Homemade Kimchi
Key Takeaways
- Homemade kimchi is far more achievable than commonly perceived, offering a rewarding culinary journey.
- This recipe focuses on readily available ingredients and simplified techniques for consistent success.
- Fermentation is a natural process that, with basic understanding, yields incredible depth of flavor.
- Customization of spice levels and ingredients allows for a truly personalized kimchi experience.
The allure of homemade kimchi lies not just in the savings, but in the profound satisfaction of coaxing complex flavors from simple vegetables through the magic of lacto-fermentation. It’s a process that connects us to ancient culinary traditions, transforming humble napa cabbage into a probiotic-rich powerhouse. This recipe is designed to be your trusted companion, guiding you through each stage with clarity and confidence, ensuring your first batch, and every subsequent one, is a triumph.
Understanding the Essence of Kimchi
At its core, kimchi is a fermentation process primarily driven by lactic acid bacteria (LAB). These naturally occurring microbes, present on the surfaces of vegetables, consume sugars and produce lactic acid, which acts as a preservative and imparts the signature sour, tangy flavor. The characteristic spiciness and umami come from a carefully balanced blend of seasonings, most notably gochugaru (Korean chili flakes), garlic, ginger, and jeotgal (fermented seafood). The specific combination of ingredients and fermentation time dictates the final taste profile, ranging from mildly tangy and crisp to intensely sour and deeply complex. The beauty of making kimchi at home is the ability to control this spectrum, tailoring it to your palate.
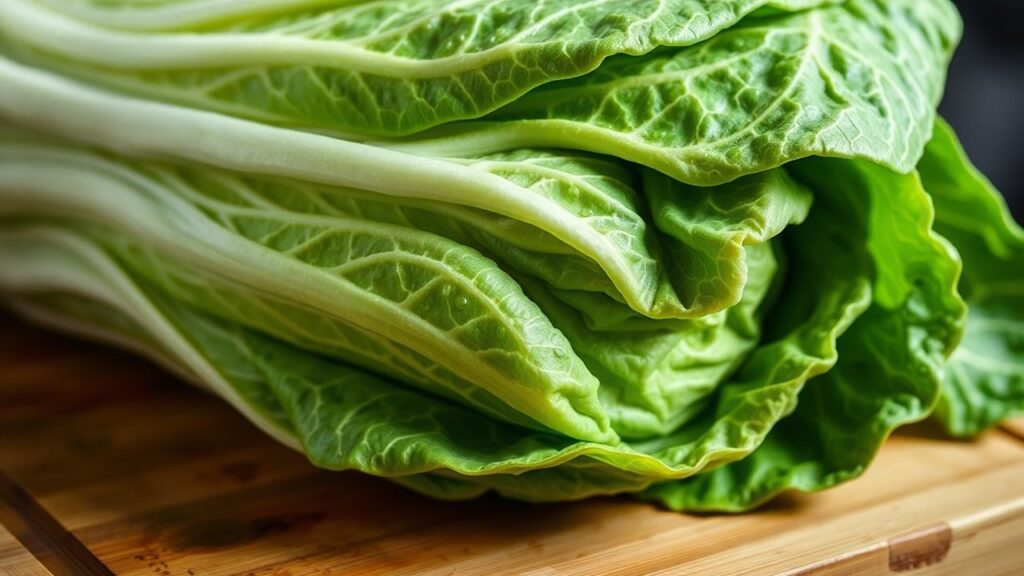
The Foundation: Choosing Your Cabbage
The star of most kimchi recipes is the napa cabbage, also known as Chinese cabbage. Its broad, crinkly leaves and tender core are ideal for absorbing the brine and seasonings, developing a delightful crunch even after fermentation. When selecting napa cabbage, look for heads that feel heavy for their size, with firm, tightly packed leaves that are a vibrant green at the outer layers and a creamy white towards the core. Avoid any with bruised or yellowed leaves, or those that feel overly soft or waterlogged. The quality of your primary vegetable directly influences the final texture and flavor of your kimchi.
The Essential Ingredients for Your First Batch
This recipe aims for accessibility, utilizing ingredients that are widely available in most well-stocked supermarkets or Asian grocery stores. While some specialty items like gochugaru are indispensable for authentic flavor, others can be adapted.
Core Components:
- Napa Cabbage: 1 large head (approx. 2 kg / 4.4 lbs)
- Salt: 1/2 cup (120 ml) coarse sea salt or kosher salt (for brining)
- Water: Enough to submerge the cabbage
The Flavor Paste (Yangnyeom):
- Gochugaru (Korean Chili Flakes): 1/2 cup (approx. 50g) – adjust to your spice preference. Look for medium-coarse grind for optimal texture and flavor.
- Garlic: 10-12 cloves, minced (about 4-5 tablespoons)
- Ginger: 1 tablespoon, finely grated (about a 1-inch piece)
- Fish Sauce: 2-3 tablespoons (e.g., anchovy or shrimp sauce). This is crucial for umami. If avoiding seafood, you can substitute with a generous pinch of dried shiitake mushroom powder or a vegan fish sauce alternative.
- Sweetener: 1 tablespoon sugar, honey, or rice syrup. This feeds the fermentation process.
- Optional: 1/4 cup (60 ml) glutinous rice flour or sweet rice flour mixed with 1/2 cup (120 ml) water, cooked into a thin paste and cooled. This helps bind the paste and aids fermentation.
Vegetable Additions:
- Korean Radish (Mu): 1 small (about 200g), julienned. Daikon radish can be substituted.
- Scallions (Green Onions): 4-5 stalks, cut into 2-inch lengths.
- Carrot: 1 medium, julienned (optional, for color and sweetness).
Nutritional Snapshot (Per Serving – approx. 1/4 cup / 100g, estimated):
This is a general estimate, as nutritional content varies significantly with fermentation time and specific ingredients used. Kimchi is a low-calorie food rich in vitamins and probiotics.
| Calories | 30-50 |
| Carbohydrates | 5-10g |
| Fiber | 2-4g |
| Protein | 1-2g |
| Sodium | Variable (can be high due to salt) |
| Vitamins | Rich in Vitamin A, C, K, and B vitamins |
| Probiotics | High concentration of beneficial bacteria |
The Step-by-Step Journey to Delicious Kimchi
The process can be broken down into three key stages: salting the cabbage, preparing the flavor paste, and combining everything for fermentation. Patience is your most valuable ingredient here.
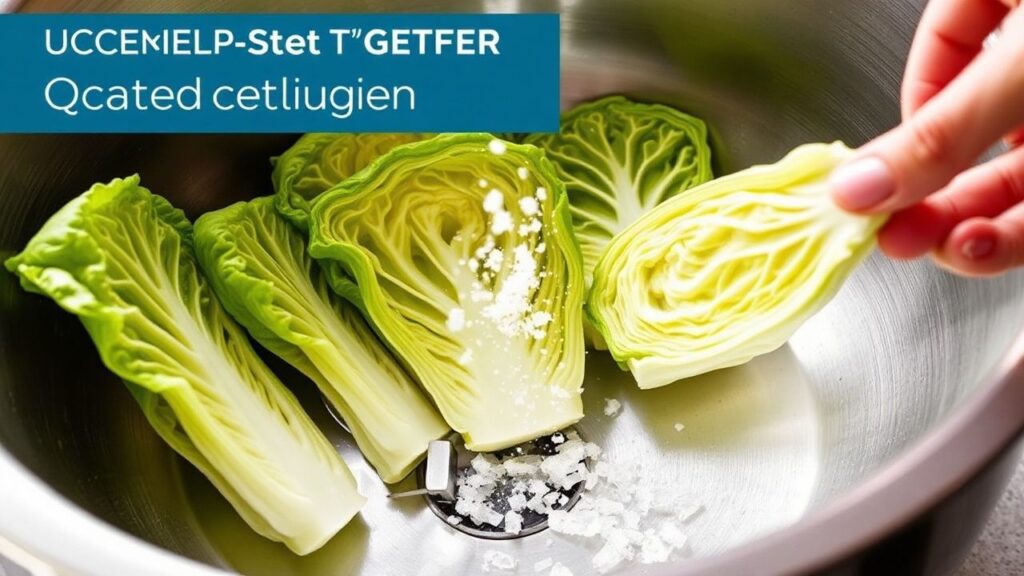
Stage 1: Salting the Cabbage – The Foundation of Texture
This is arguably the most critical step for achieving the correct texture. Salting draws out excess water from the cabbage, making it pliable and preventing it from becoming mushy during fermentation.
- Prepare the Cabbage: Trim off any bruised outer leaves. Cut the cabbage lengthwise into quarters. If the core is very thick, you can make a shallow cut into it to help the salt penetrate.
- Brining: In a large basin or sink, liberally sprinkle the coarse salt between each leaf of the cabbage quarters. Ensure every surface is coated. You can also dissolve the salt in water to create a brine, then submerge the cabbage. The goal is to wilt the cabbage, not to pickle it.
- Resting and Flipping: Let the cabbage sit for 1.5 to 2 hours, turning the quarters every 30 minutes. The leaves should become limp and flexible, bending without snapping. You’ll notice a significant amount of water being released.
- Rinsing and Draining: Once wilted, thoroughly rinse each cabbage quarter under cold running water, at least 3-4 times, to remove excess salt. Gently squeeze out as much water as possible. Place the cabbage quarters cut-side down in a colander to drain for at least 30 minutes. This residual moisture is important for the paste to adhere.
Stage 2: Crafting the Flavor Paste (Yangnyeom)
While the cabbage drains, prepare the vibrant flavor paste. This is where the magic of Korean flavors truly comes alive.
- Make the Rice Paste (Optional but Recommended): In a small saucepan, whisk together the glutinous rice flour and water. Heat over medium heat, stirring constantly, until it thickens into a thin, translucent paste. Remove from heat and let it cool completely. This paste acts as a binder for the seasonings and encourages beneficial bacteria growth. Many traditional recipes from Korean cuisine rely on this binder for optimal texture.
- Combine Paste Ingredients: In a medium bowl, combine the gochugaru, minced garlic, grated ginger, fish sauce, and sweetener. If using the rice paste, stir it into this mixture until well combined.
- Incorporate Additional Vegetables: Add the julienned radish and carrot (if using) to the paste. Mix thoroughly. The paste should be thick and spreadable.
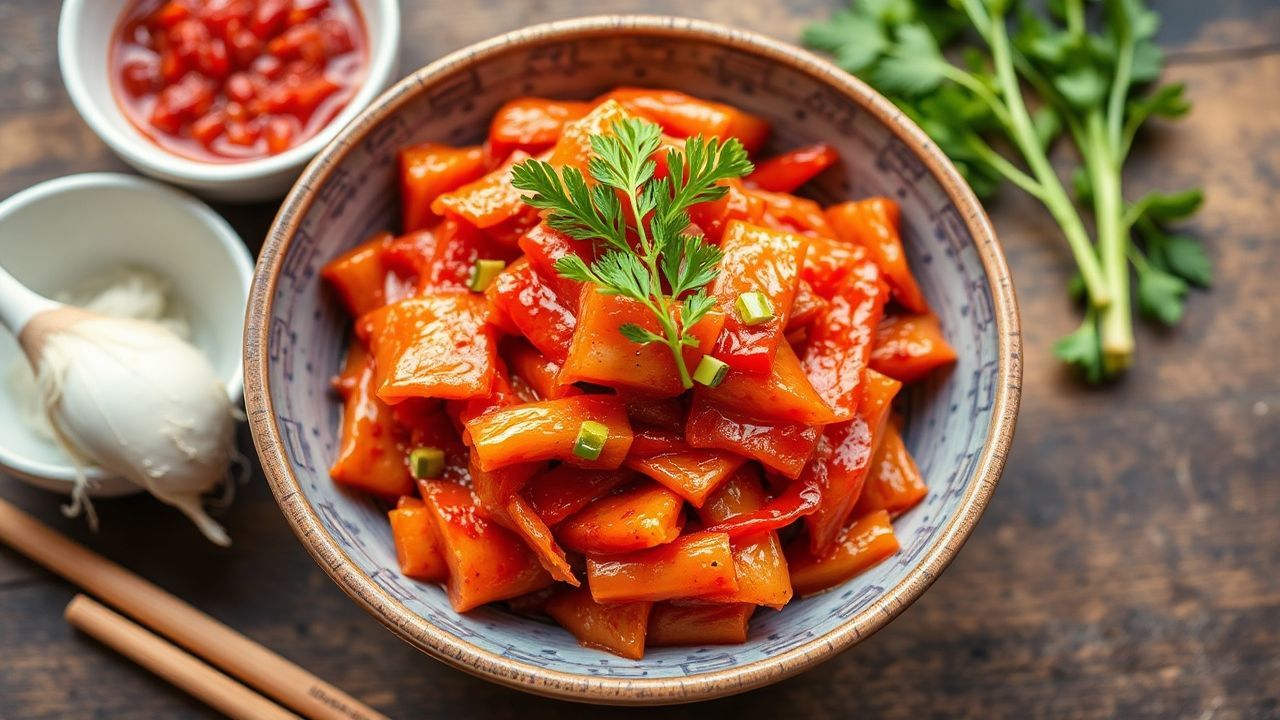
Stage 3: Assembling and Fermenting Your Kimchi
This is the moment of transformation. The careful assembly ensures each leaf is coated, leading to an even fermentation.
- Apply the Paste: Take one drained cabbage quarter at a time. Wearing gloves (highly recommended to avoid chili stains and irritation), carefully spread the flavor paste between each leaf, ensuring an even coating from the core to the tips. Be thorough but gentle, as you don’t want to tear the leaves.
- Fold and Pack: Once coated, fold the cabbage quarter in half, then tuck the outer leaves around it to create a compact package.
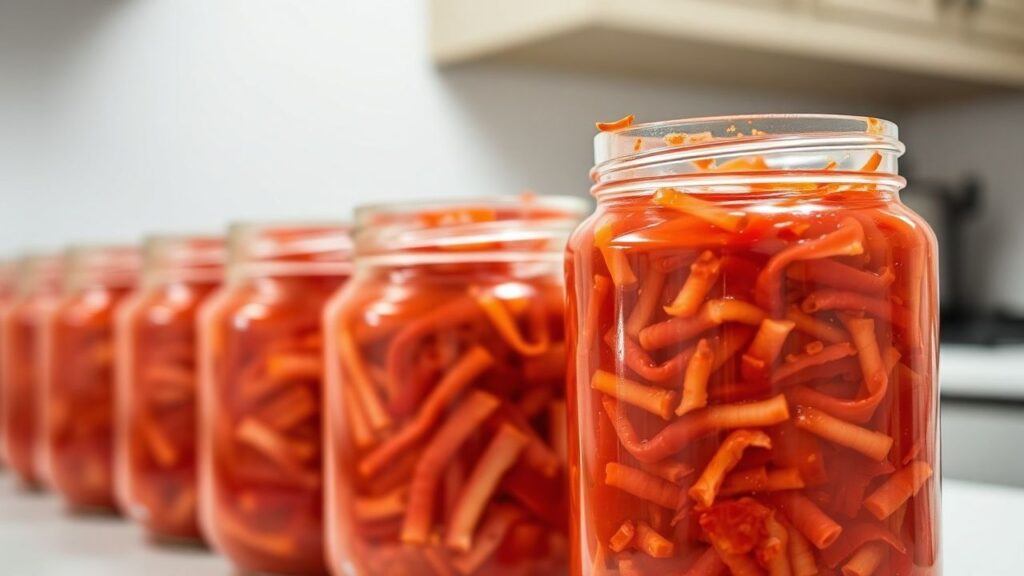
- Jarring: Tightly pack the folded cabbage quarters into clean, sterilized jars or an airtight fermentation vessel. Press down firmly to remove any air pockets. Leave about 1-2 inches of headspace at the top. The brine released from the cabbage and paste should rise and cover the solids. If it doesn’t, you can add a little reserved brine from the salting stage or a lightly salted water solution.
- Fermentation: Seal the jars loosely (if using screw-top lids, unscrew them slightly to allow gases to escape) or use fermentation weights and airlocks. Let the kimchi sit at room temperature for 1 to 5 days. The ideal duration depends on your ambient temperature and desired level of sourness. You’ll notice bubbles forming, indicating active fermentation. Taste a small piece daily to monitor the flavor development.
- Refrigeration: Once the kimchi reaches your preferred level of tanginess, transfer the jars to the refrigerator. This significantly slows down the fermentation process, preserving the flavor and texture. Kimchi can be enjoyed immediately after refrigeration, but it continues to develop and deepen in flavor over weeks and months.
Expert Pro-Tips for Elevated Kimchi
Achieving a truly exceptional batch of kimchi involves a few subtle techniques and considerations that can elevate it from good to sublime. These insights are honed through years of practice and observation.
Customization and Variations
While this recipe provides a solid foundation, the world of kimchi is vast and invites personalization.
Spice Level Adjustment:
The amount of gochugaru is the primary determinant of heat. For milder kimchi, reduce the gochugaru by half or even two-thirds. For a fiery kick, increase it or incorporate a small amount of hotter chili powder.
Sweetness Control:
The sweetener balances the saltiness and acidity. Adjust to your preference. Some prefer a slightly sweeter kimchi, while others enjoy a more pronounced tang.
Vegetable Additions:
Beyond radish and scallions, consider adding julienned cucumber, chives, mustard greens, or even thinly sliced pears for a touch of sweetness and aroma. For a robust, mature flavor, some recipes include a small amount of salted shrimp or oysters (saeujeot or굴젓).
Troubleshooting Common Issues
Even with careful preparation, occasional hiccups can occur. Understanding these potential problems can help you overcome them.
Mushy Texture: This is most often due to insufficient salting, meaning the cabbage didn’t release enough water. Ensure you follow the salting and draining steps meticulously. Alternatively, over-fermenting at room temperature can also lead to a softer texture.
Lack of Tanginess: If your kimchi isn’t developing the desired sourness after several days of fermentation, it might be due to a cooler ambient temperature or insufficient active fermentation. Ensure your fermentation space is consistently warm (around 20-24°C or 68-75°F). You can also extend the room temperature fermentation period.
Off-Smells: A slight yeasty or alcoholic aroma is normal during fermentation. However, if you detect a strong, unpleasant, rotten, or putrid smell, it could indicate spoilage. This is rare with proper hygiene and salting but can happen if contamination occurs. In such cases, it’s best to discard the batch and start anew, ensuring all equipment is thoroughly sanitized.
The Art of Enjoying Your Homemade Kimchi
Once your kimchi is ready, the possibilities for enjoyment are nearly endless. It’s not merely a condiment; it’s a versatile ingredient that can transform a multitude of dishes.
Classic Pairings:
Serve it as a vibrant side dish (banchan) with virtually any Korean meal, from bibimbap to bulgogi. Its pungent tang cuts through rich, fatty meats beautifully. It’s also an essential component in dishes like kimchi jjigae (stew), kimchi fried rice, and kimchi pancakes (kimchijeon).
Beyond Korean Cuisine:
The tangy, spicy notes of kimchi can add an exciting dimension to non-Korean dishes. Try topping a grilled cheese sandwich, mixing it into scrambled eggs, adding it to tacos, or using it as a flavor enhancer in salad dressings. For a truly unique experience, consider incorporating it into a pasta sauce or as a topping for a gourmet burger. For those seeking inspiration for everyday meals, websites like dinnercook.com and recipesease.com offer a plethora of creative ways to utilize fermented ingredients.
Frequently Asked Questions About Homemade Kimchi
Q1: How long does homemade kimchi last?
In the refrigerator, properly fermented kimchi can last for several months, even up to a year. Its flavor will continue to evolve, becoming more sour and complex over time. The initial taste you achieve after the first week or two of refrigeration is generally considered its prime, but many enjoy the deeper flavors that develop later.
Q2: What is the role of gochugaru in kimchi?
Gochugaru, Korean chili powder, is the defining spice of traditional kimchi. It provides not only heat but also a distinctive red color and a subtle sweetness and smokiness that are crucial to the authentic flavor profile. The type and grind of gochugaru can affect the final texture and intensity of the spice.
Q3: Can I make kimchi without fish sauce?
Yes, absolutely. For a vegan or vegetarian kimchi, you can omit the fish sauce. To compensate for the lost umami, consider adding a tablespoon of soy sauce, a pinch of mushroom powder (especially dried shiitake), or a small amount of a vegan fish sauce substitute. Some recipes also incorporate a bit of kelp (dashima) broth for depth.
The journey of making kimchi at home is a rewarding exploration of fermentation, flavor, and tradition. By following these steps and embracing the subtle nuances of the process, you’ll unlock a world of delicious possibilities, proving that this iconic Korean staple is not only achievable but also a delightful and deeply satisfying culinary endeavor.
See also: kimchi

